You downloaded the app you needed, double-clicked it — and instead of launching, you saw a warning about an unknown developer. Sound familiar? macOS by default won’t let you open applications downloaded outside the App Store, and this stumps many users. Let’s figure out why this happens and how to remove the app installation restriction — from the simple method to completely disabling protection via Terminal.

In macOS there’s a security feature that creates more problems than it solves
Why macOS Blocks App Installation on Mac
The blocking is handled by a built-in mechanism called Gatekeeper. It first appeared in OS X Mountain Lion and has since become an integral part of Apple’s security system. Gatekeeper’s job is to verify the digital signature of every application before it launches. If the app is signed with a certificate from a developer registered with Apple, it will open without any issues. If not — the system will show a warning and simply won’t allow it to launch.
Previously, macOS security settings had an “Anywhere” option that allowed you to permit the launch of any application with a single toggle. But Apple removed this option from the interface back in macOS Sierra. Since then, only two options remain in System Settings: App Store and App Store and identified developers. The third option is hidden, but it still exists — it’s just become harder to access.
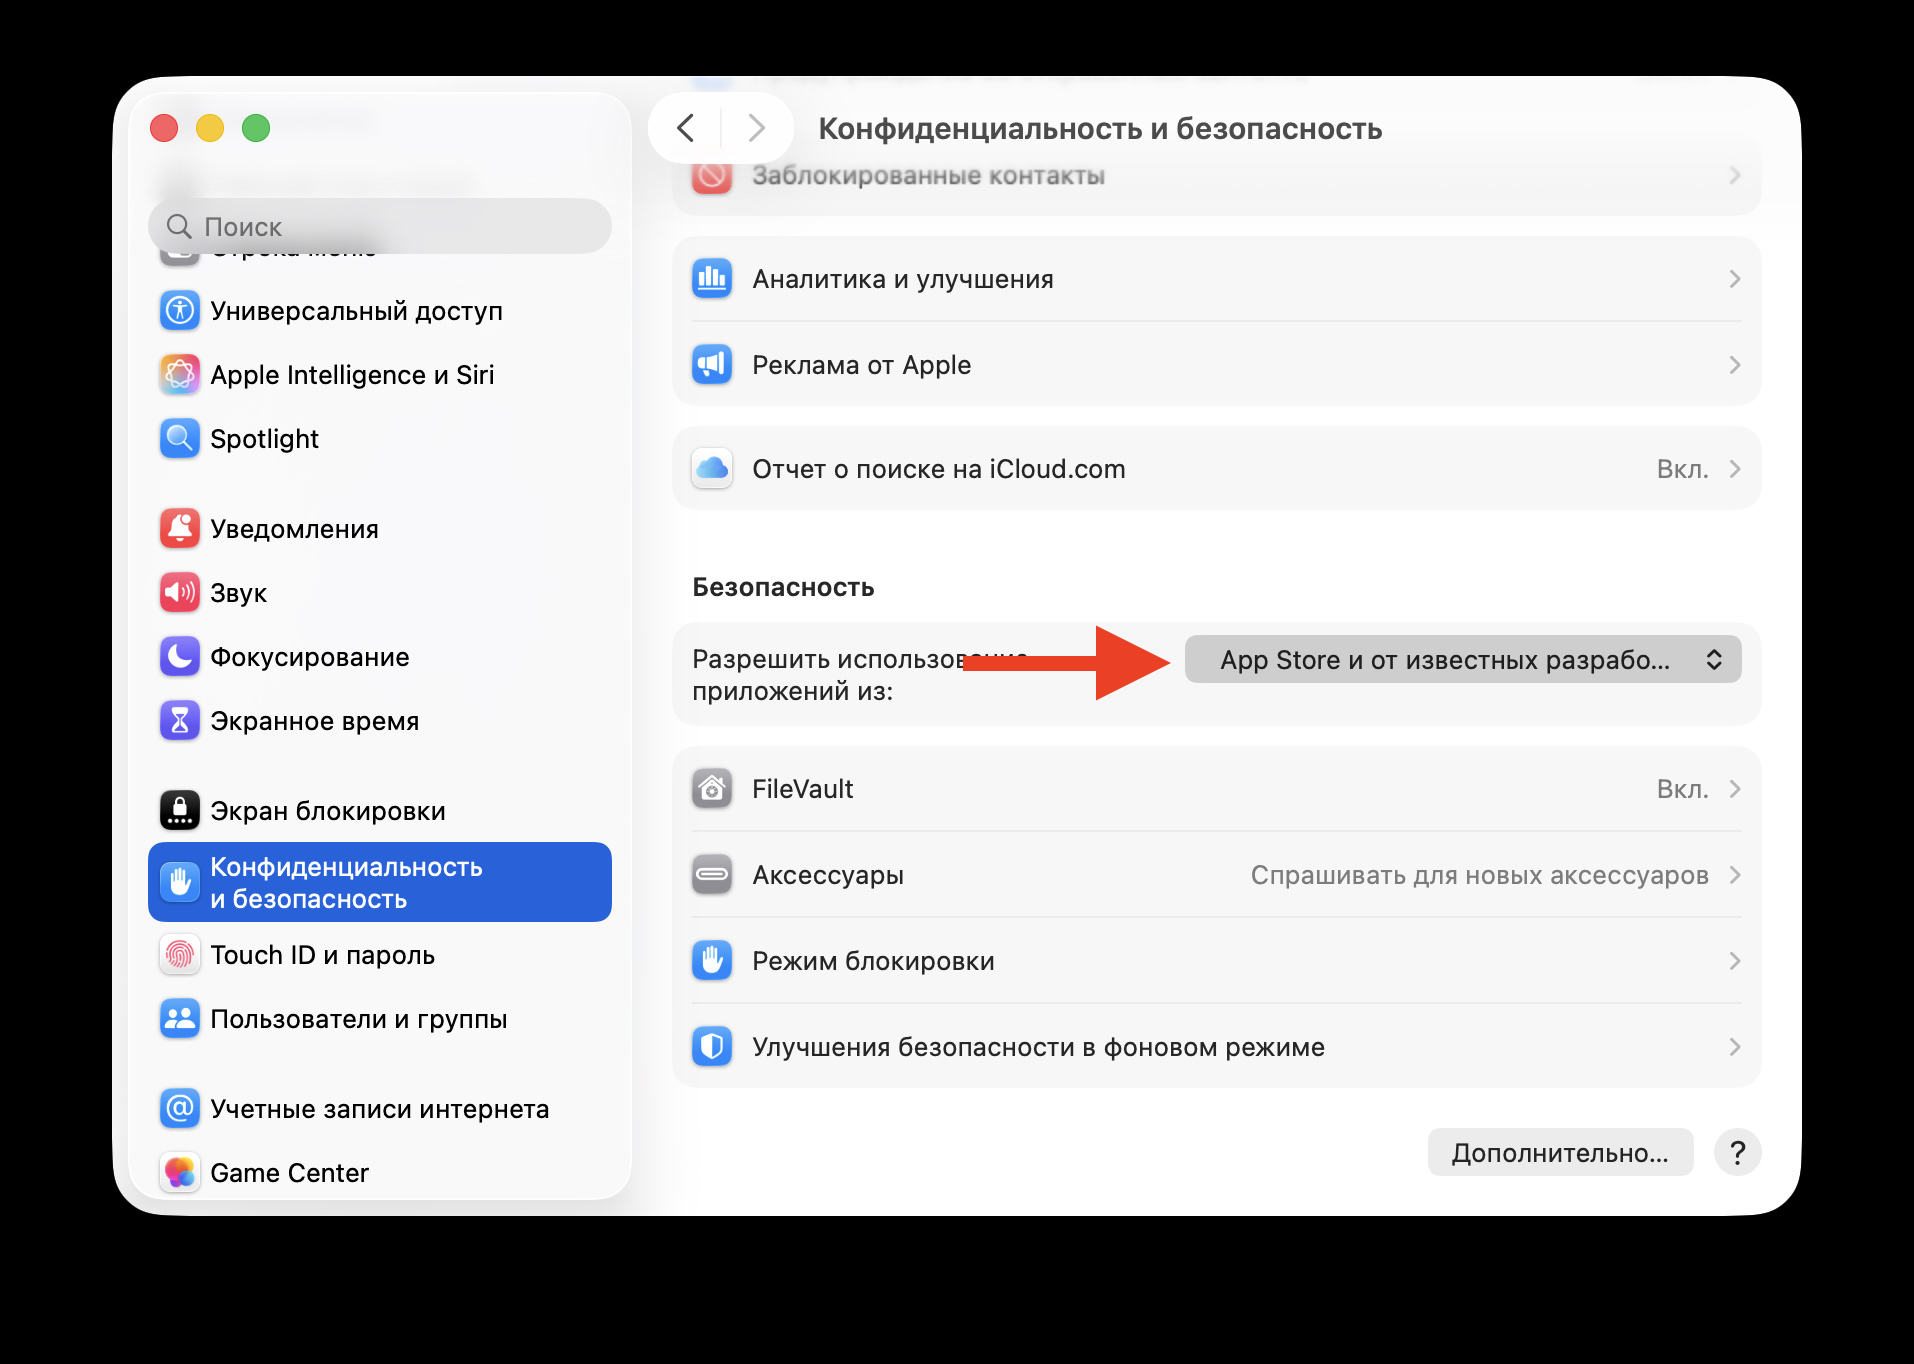
The “Anywhere” option is not available by default
Why did Apple do this? The logic is clear: most users are fine with apps from the App Store and from verified developers. And Gatekeeper protects against malware that can disguise itself as useful utilities. But if you know for certain that the downloaded app is safe — for example, it’s a utility from GitHub or an app unavailable in your regional App Store — the restriction can be bypassed.
Installing an App from an Unknown Developer on Mac
If you need to launch one specific application, you don’t have to disable all protection entirely. macOS has a way to open an unsigned app on a case-by-case basis without affecting other security settings.
Here’s how to do it. Find the downloaded application in Finder — it’s usually in the Downloads or Applications folder. Don’t try to launch it with a double-click — instead, hold the Control key and right-click the app icon (or use the trackpad). In the context menu that appears, select “Open.”
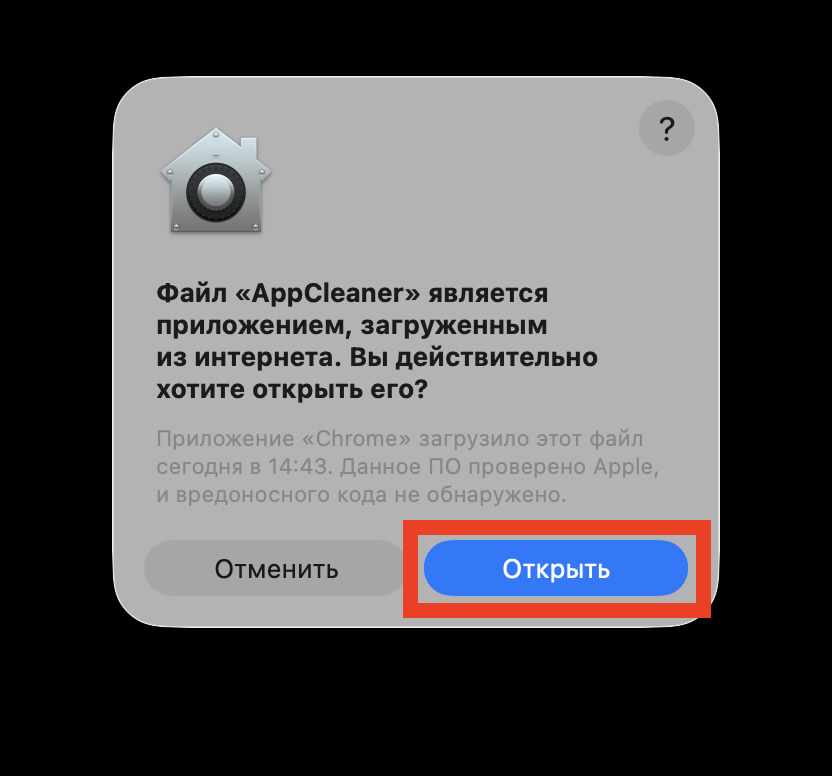
Give the app permission to launch, and everything will work
After that, macOS will show a warning, but this time the window will have an “Open” button. Click it — and the app will launch. The system will remember your choice: from now on, this app will open without warnings, as usual.
This method is convenient when you need to install one or two apps. You don’t lower the overall security level of your Mac — Gatekeeper continues to work for all other applications. But if you regularly use software from independent developers and are tired of going through this procedure every time, there’s a more radical solution.
How to Disable Gatekeeper via Terminal on Mac
This method brings back the “Anywhere” option in security settings that Apple hid. After applying it, macOS will stop blocking unsigned applications altogether.
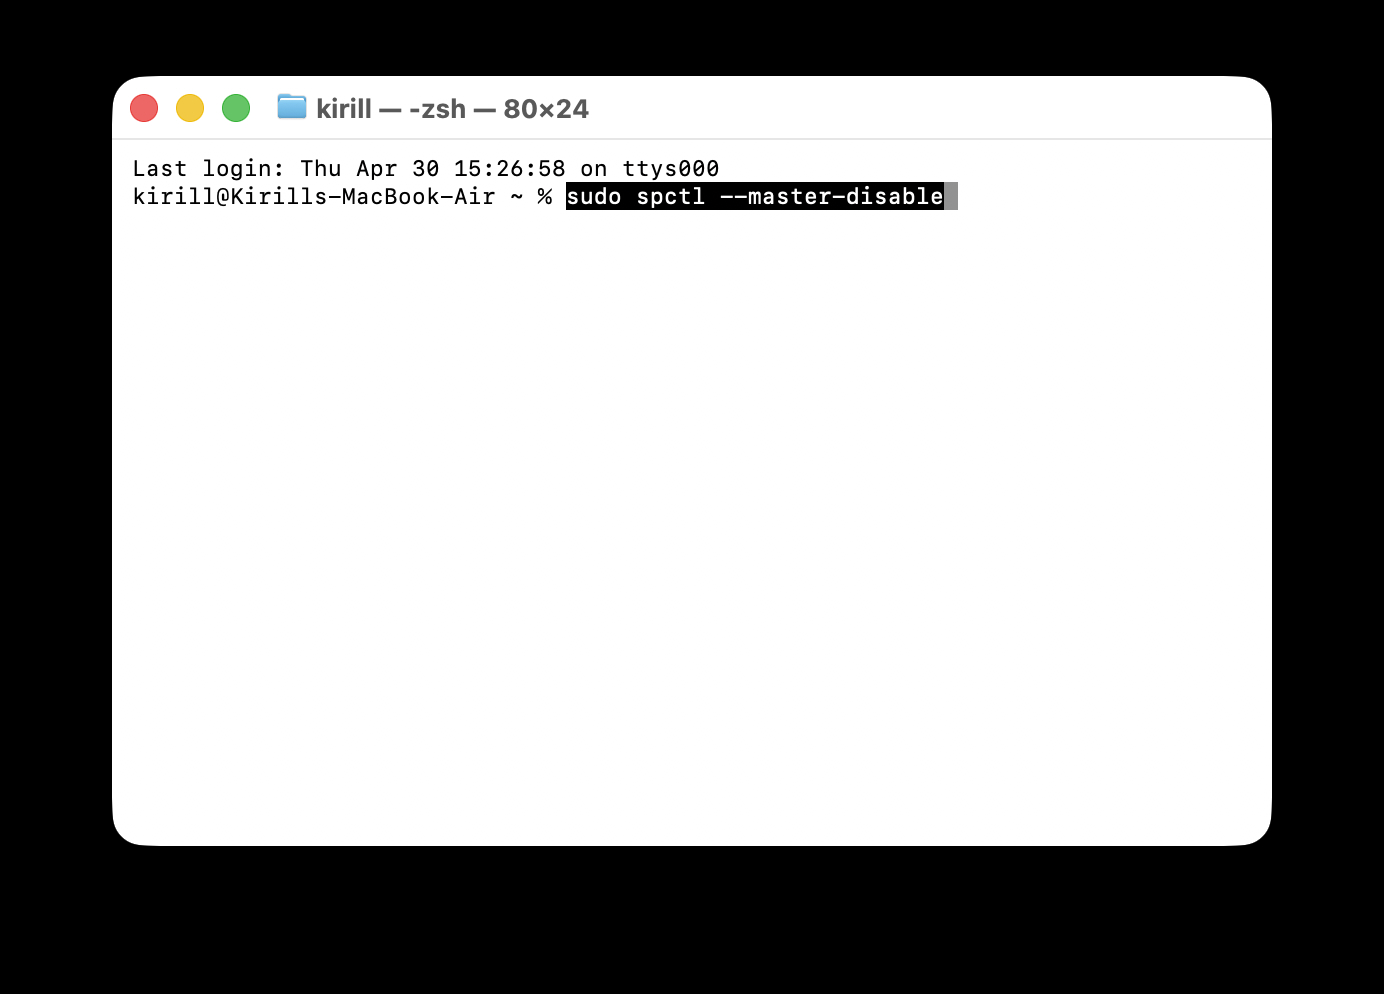
Open Terminal on your Mac. The easiest way to find it is through Spotlight — press Cmd + Space, start typing “Terminal” and press Enter. You can also find it in the Applications — Utilities folder.
Gatekeeper can be disabled with a single Terminal command
In the Terminal window that opens, enter the following command:
sudo spctl --master-disable
Press Enter. The system will ask for your account password — the same one you use to unlock your Mac. When typing the password, characters won’t appear on screen — this is normal. Enter the password and press Enter again.
Done. Now open System Settings — Privacy & Security (or Security & Privacy in earlier versions of macOS). In the “Allow applications downloaded from” section, a third option will appear — “Anywhere.” It will already be active.
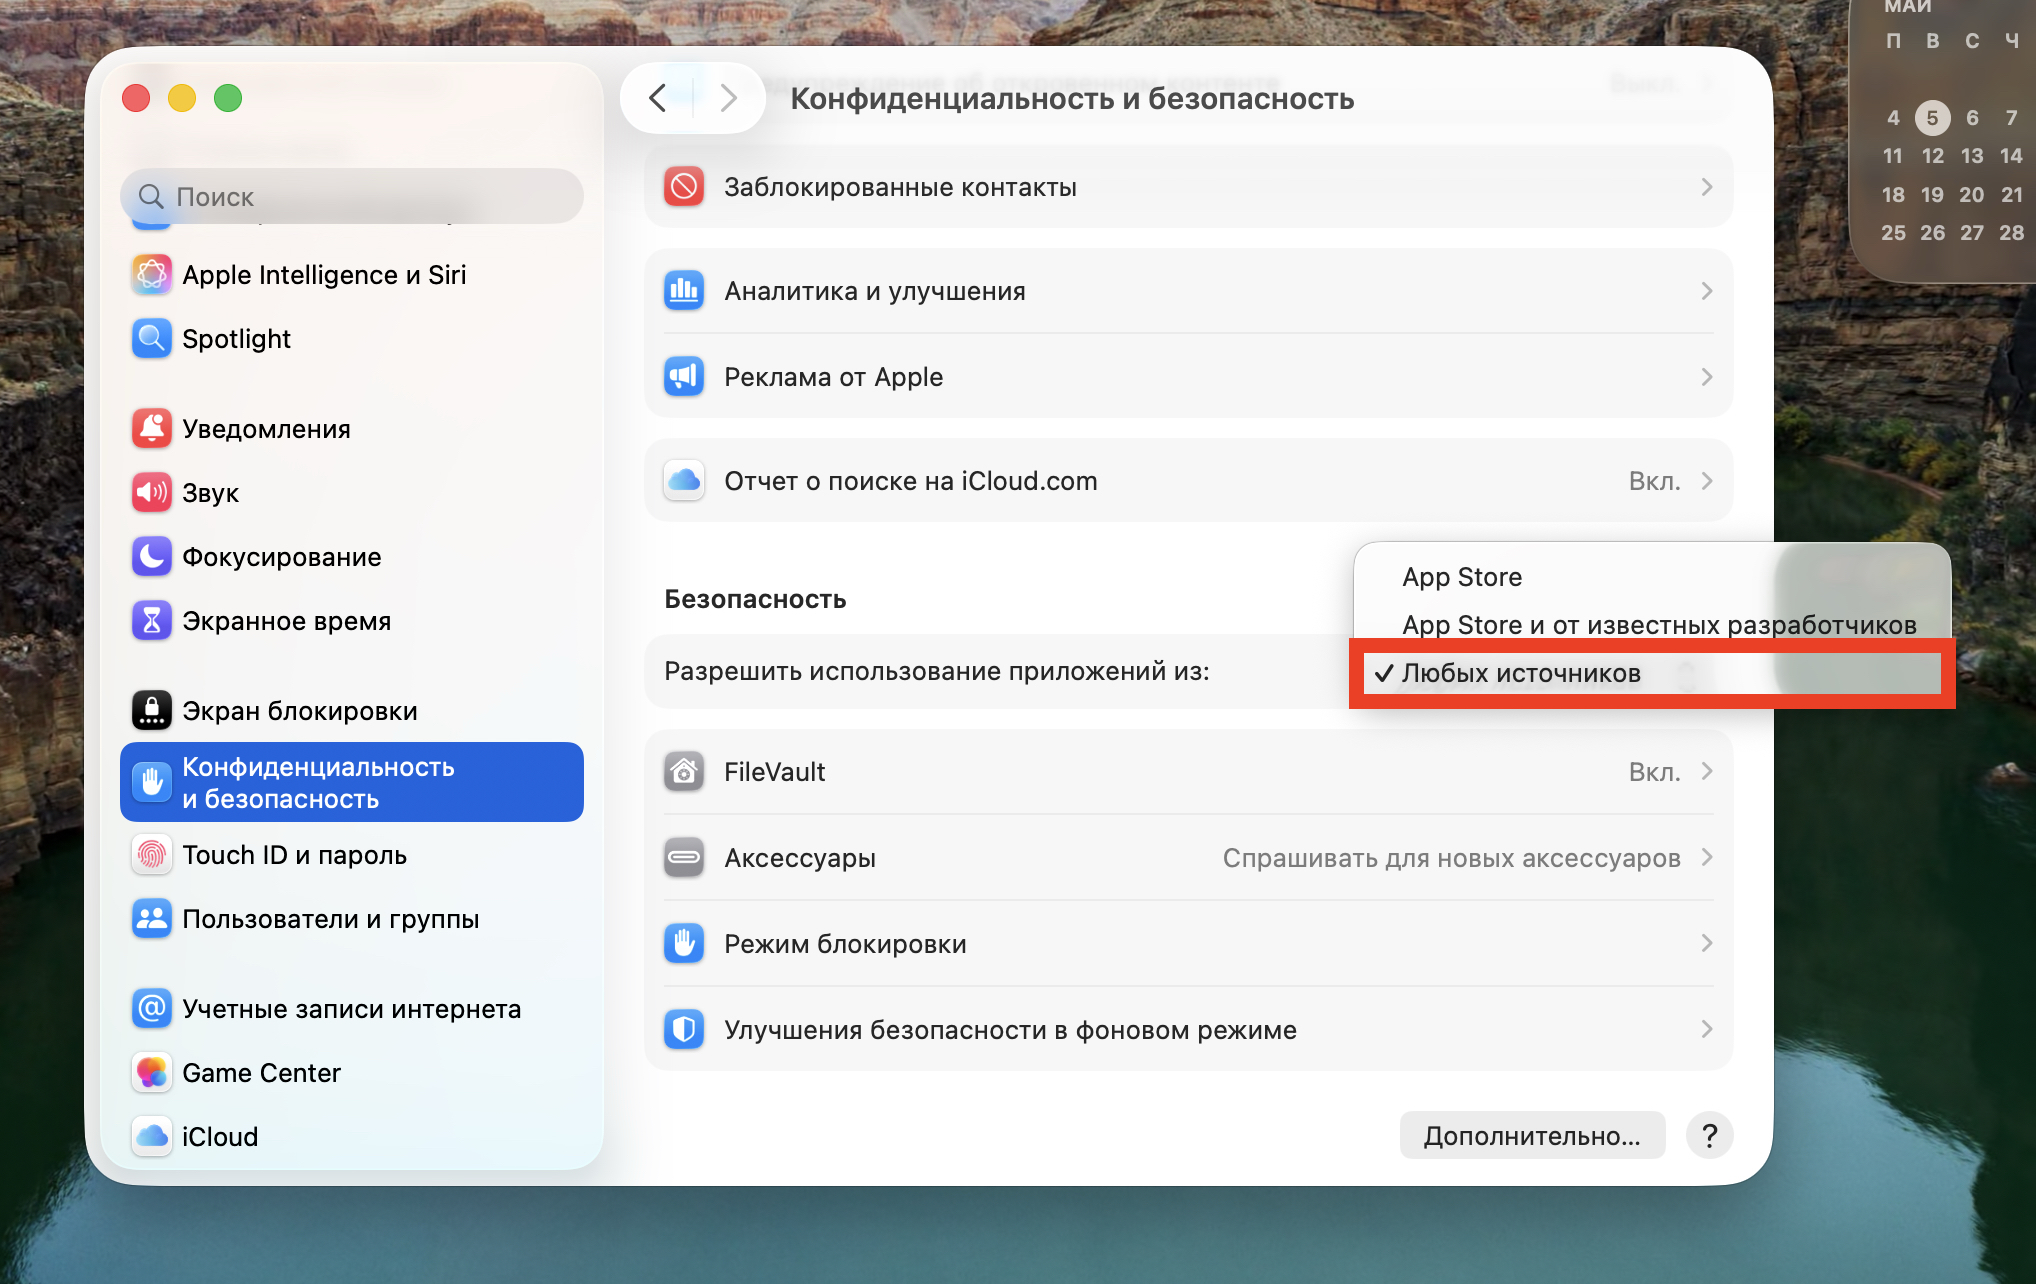
The needed option will immediately appear in settings
From this point on, macOS won’t block any applications — you’ll be able to install and launch anything you want. But remember: the responsibility for security falls entirely on you. Don’t download apps from suspicious websites and always verify the download source.
If you want to restore protection, open Terminal and enter the reverse command:
sudo spctl --master-enable
After this, Gatekeeper will turn back on and resume filtering applications.
What Changed with App Launching in macOS Sequoia and Later
If your Mac runs macOS 15 Sequoia or later, the process is slightly different. Apple once again tightened its security policy, and now even after entering the Terminal command, additional confirmation may be required.
In Sequoia, when trying to launch an unsigned app, the system may not just show a warning but redirect you to System Settings for manual confirmation. This means even with Gatekeeper disabled, when launching a new app for the first time, macOS will ask you to go to System Settings — Privacy & Security and click “Open Anyway” next to the blocked application.
This is an additional layer of protection that Apple added specifically in Sequoia. The idea is that the system wants to make sure you’re consciously launching an unsigned app and not doing it by accident. The procedure takes just a few seconds, but it’s worth knowing about — so you won’t be surprised when the Terminal command seems to have worked, but the app still won’t open on the first try.