MAX is a Russian messenger, and this guide is aimed at its users who own an iPhone. According to the source, the official MAX app for iOS has fallen noticeably behind its Android version: after the app’s removal from the App Store, iPhone users have no Stories, the web version does not support the messenger’s Digital ID, customisation is minimal and notifications are unreliable. The workaround described by the source is Komet, an unofficial third-party client for MAX, not the official app. It is distributed through DIYORDE Store, a paid sideloading store whose app is called DDE Store. The source says the method requires neither a jailbreak nor a computer. Below is the full procedure as the source describes it, along with the limitations it mentions.
What you need to know
- Komet is an unofficial client for the Russian MAX messenger; it is installed via the DIYORDE Store (DDE Store app), which requires iOS Developer Mode and a paid subscription.
- The store lists subscriptions at $9.90 for one month, $19.90 for three months and $29.90 for six months (prices as quoted by the source), with payment options aimed at Russian bank cards and the SBP system.
- Push notifications in Komet do not work the standard way: they are set up through a web page (push.komet.pw) added to the iPhone home screen, and that icon must not be deleted.
- The source says Komet adds Stories, a Digital ID card, expanded customisation, a proxy option and other features missing from the official iOS app or web version.
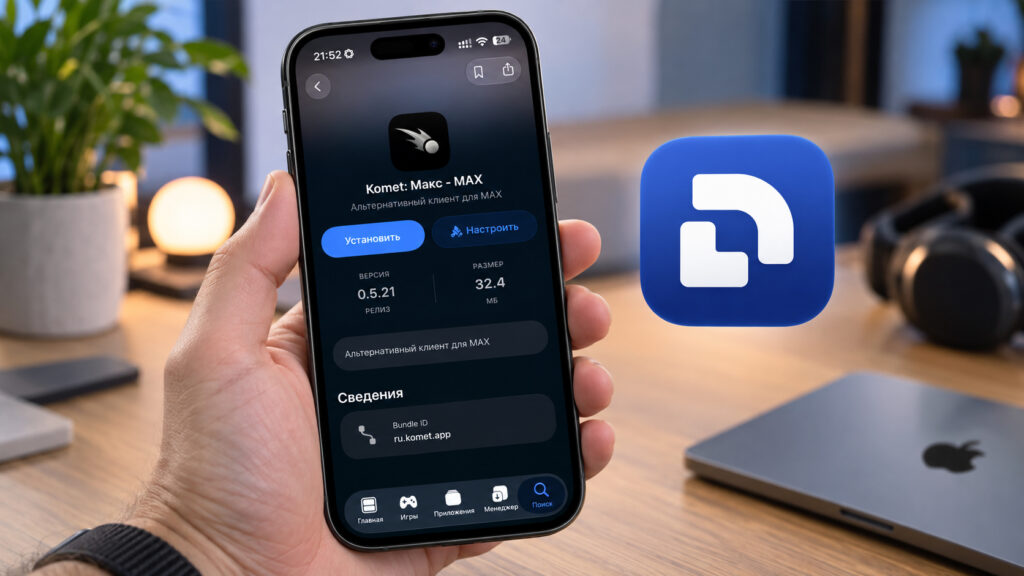
Installing Komet, an alternative client for the MAX messenger
Editor’s note: Following this guide means entering your MAX phone number, the SMS confirmation code and, if enabled, your two-factor password into an unofficial client built by a third party. That effectively hands access to your account to that developer. The source offers no confirmation from MAX, VK or Apple that Komet or the DIYORDE Store are safe, and Hi-News.com has not verified them independently. Readers should weigh that risk before proceeding.
Step 1: Enable Developer Mode on the iPhone
The whole method relies on installing apps outside the App Store, and for that the iPhone must allow third-party builds. This is controlled by Developer Mode. The source notes that on some devices the option is simply absent from Settings, and points to a separate explainer on how to restore it, which is not reproduced here.
Enabling it takes a few taps:
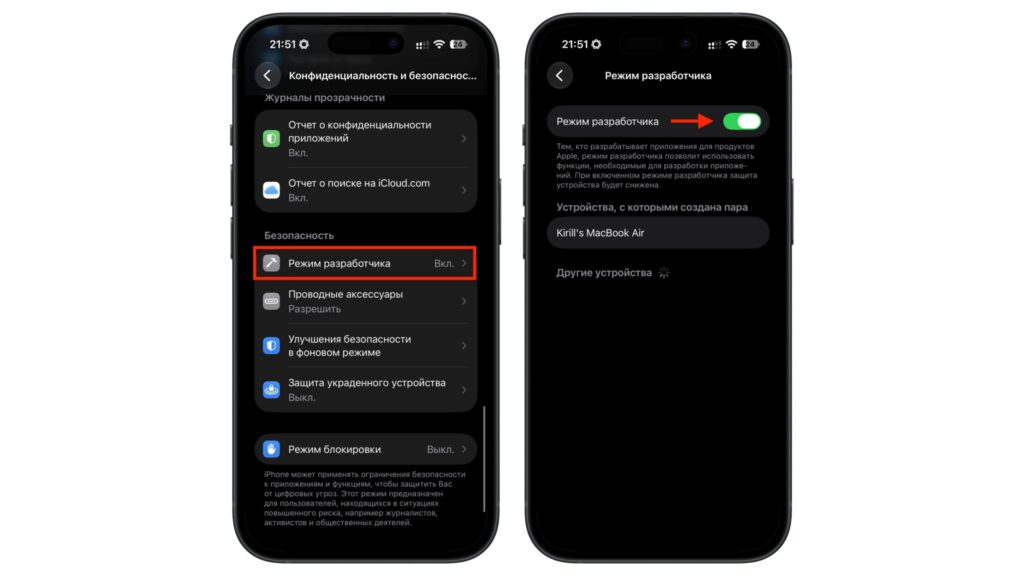
Enabling Developer Mode on an iPhone
- Open Settings and go to Privacy & Security.
- Scroll to the Security section and select Developer Mode.
- Turn the switch on.
- The iPhone will ask to restart. Agree, and confirm the activation after the reboot.
iOS will warn that device security is somewhat reduced while the mode is active. The source considers this expected for the task and notes the mode can be switched off again at any time with the same toggle.
Step 2: Install DIYORDE Store (the DDE Store app)
Apps outside the App Store are installed through a dedicated store. In this case it is DIYORDE Store; that is the store’s name, while its app is called DDE Store. The source describes it as a large catalogue of programs that are either absent from the Russian App Store or listed there under different names, including MAX itself, Sberbank, VTB, VK and dozens of others. It is, in effect, a full alternative app store operating by its own rules. According to the source, the store does not work without a paid subscription.
To get access, the source describes taking out a subscription:
- Go to diyorde.com and tap the Start button.
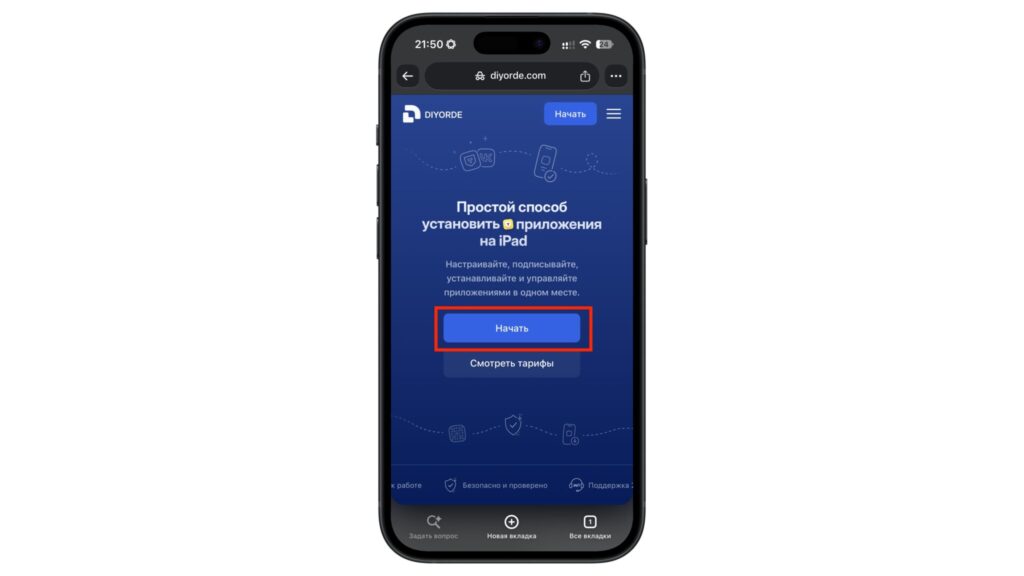
Starting the DDE Store installation
- Choose a plan. As quoted by the source: 1 month for $9.90, 3 months for $19.90 or 6 months for $29.90.
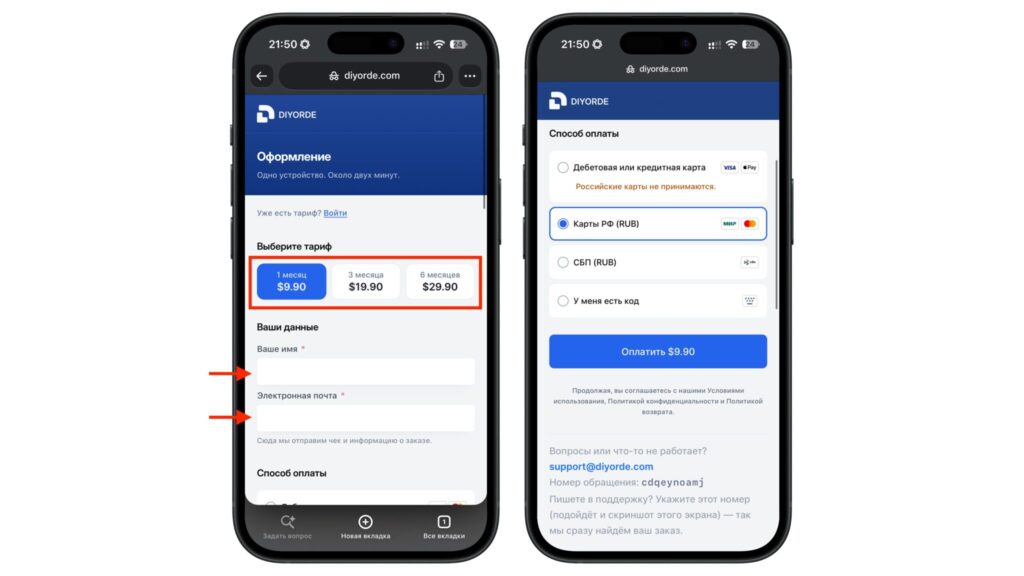
Choosing a subscription plan and payment method
- Enter a name and email address; the receipt and order details are sent there.
- Choose a payment method. The source notes that Russian bank cards are rejected on the standard option, so Russian users are directed to the “Russian cards (RUB)” or “SBP (RUB)” options. A promo code, if you have one, goes in the “I have a code” field.
- Tap Pay and complete the payment.
After payment, the site offers to install a device profile:
- On the “Sign in on this iPhone” page, tap Install Profile.
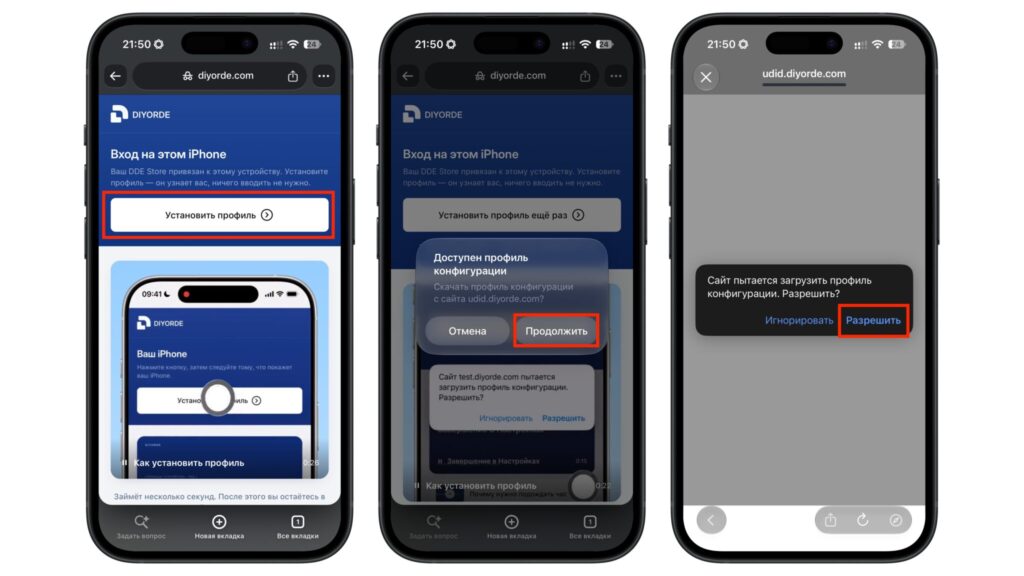
Adding a profile to the iPhone
- In the “Configuration profile available” dialog, choose Continue, then Allow.
- Open Settings; a “Profile Downloaded” line will appear at the top. Tap it.
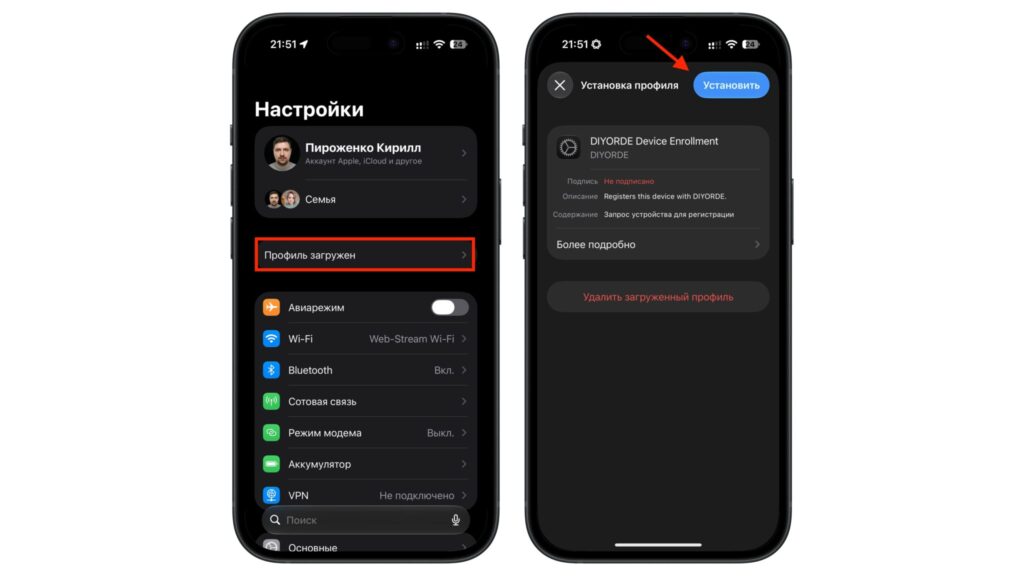
Installing the profile on the iPhone
- On the “Install Profile” screen, tap Install and confirm.
What remains is installing the store itself. Return to the website, tap Install on the “Install the DIYORDE app” screen and wait for the DDE Store icon to appear on the home screen.
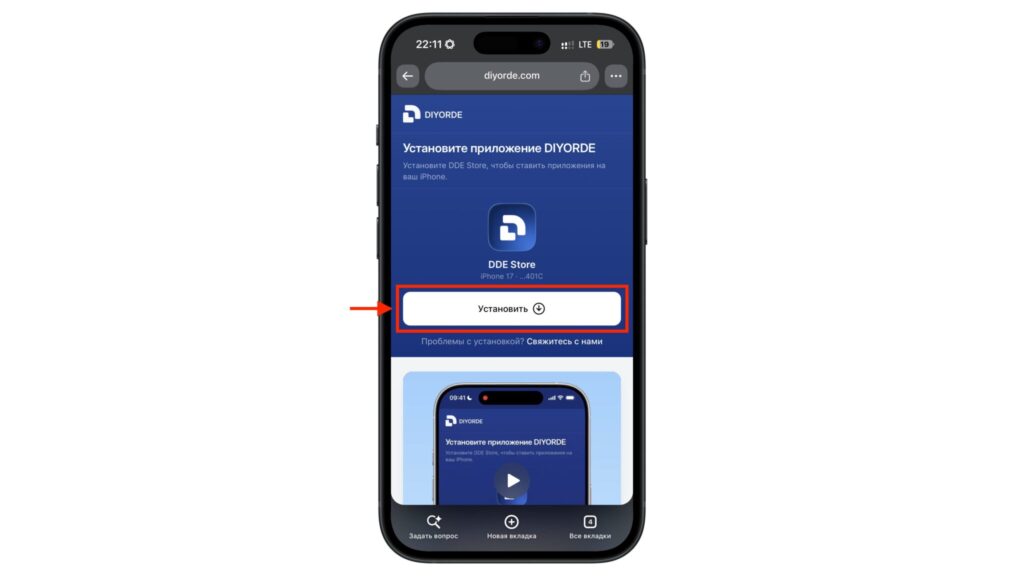
Finishing the DDE Store installation
Step 3: Install Komet and sign in to your MAX account
According to the source, the official MAX app for iPhone has not been updated since June, which is why Stories and some newer features are missing on iOS. Komet is described as an alternative client for the same MAX service that fills those gaps. It is installed from the store you have just set up, so the following steps happen inside DIYORDE Store.
- Open the DDE Store app from the home screen.
- Go to the Search tab and type Komet.
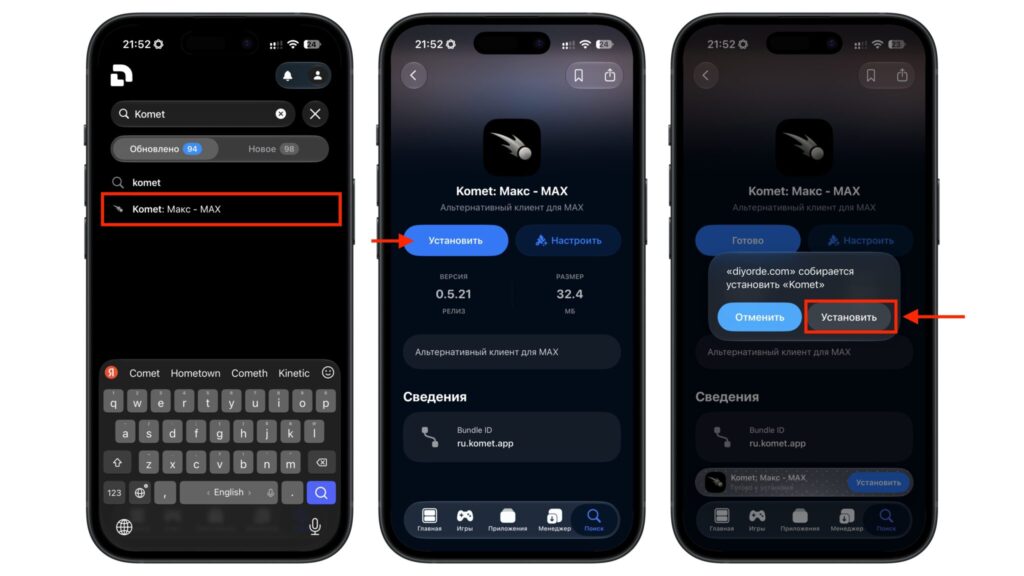
Installing Komet on an iPhone
- Select the listing named “Komet: Макс — MAX” (the middle word is simply “MAX” written in Cyrillic), tap Install, then confirm the installation in the pop-up.
- Wait for the Komet icon to appear on the home screen and launch the app.
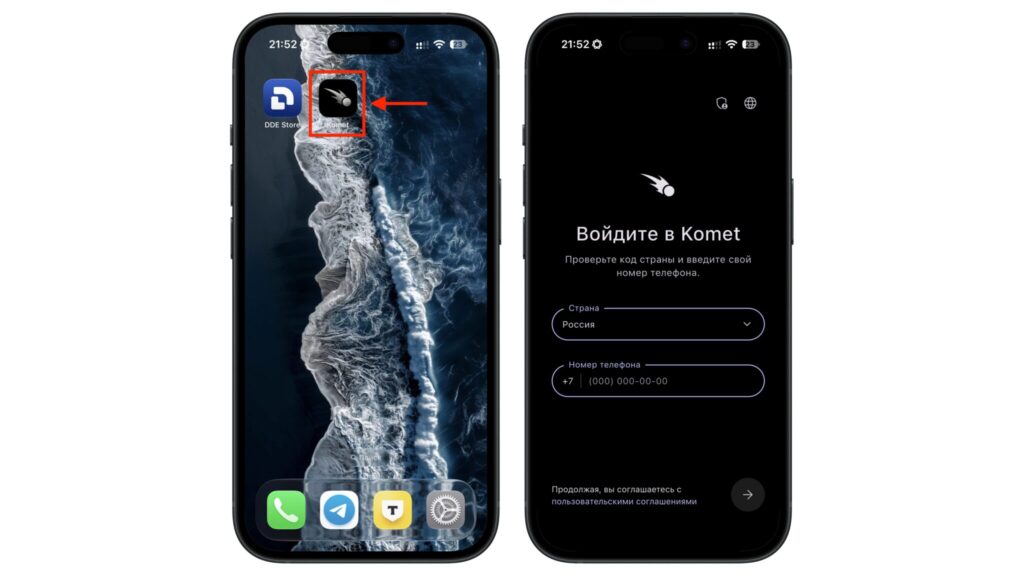
The Komet icon on an iPhone screen
- On the sign-in screen, select Russia as the country, enter your phone number and confirm it with the SMS code.
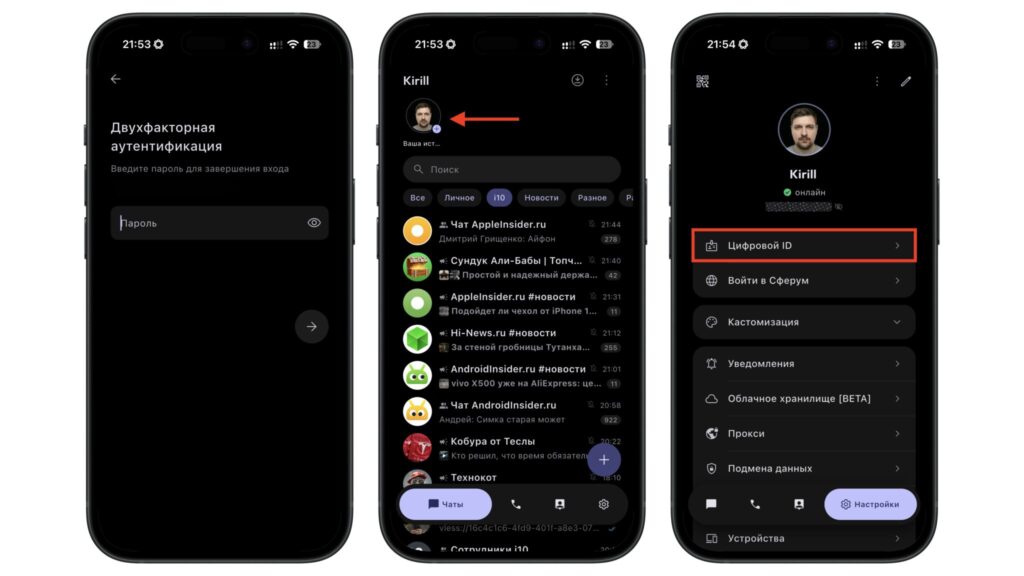
Signing in and the Komet interface
- If two-factor protection is enabled on the account, enter the password; you will then land in the familiar MAX interface.
The source says all chats, contacts and message history load automatically, because Komet works with the same account as the official app and simply exposes more of it. Keep in mind the editor’s note above: these credentials are being entered into third-party software for which the source cites no endorsement from MAX.
Step 4: Enable push notifications through the web
Notifications in Komet are a separate matter. They cannot be enabled the usual way, as in an App Store app; instead they are connected via a web page, following a procedure defined by Komet itself. The source explains the logic: iOS delivers notifications only to web apps that have been added to the home screen, so the page has to be placed there first.
- Open the page push.komet.pw in Safari.
- Tap the Share button at the bottom of the screen and choose “Add to Home Screen”.
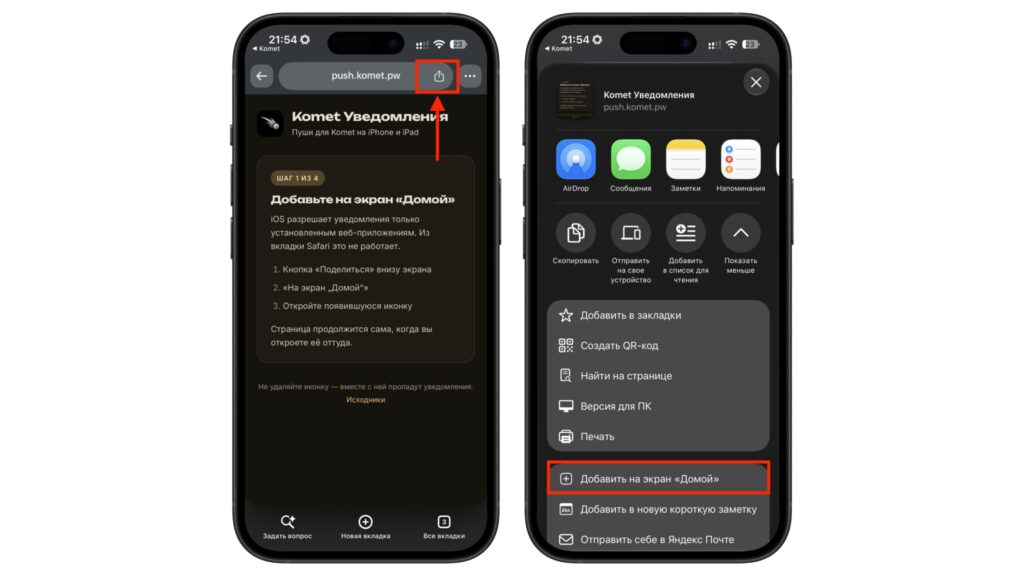
Adding the Komet push page to the iPhone home screen
- Launch the new icon. Everything must be done from this icon, not from the Safari tab.
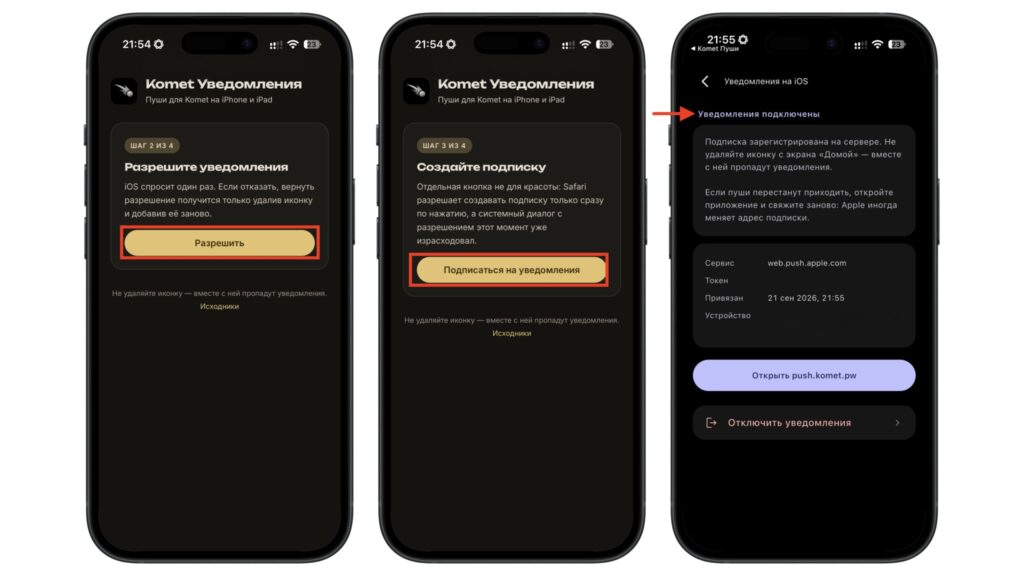
Connecting notifications to the Komet app
- At the “Allow notifications” step, tap Allow. The system asks this only once.
- At the “Create a subscription” step, tap “Subscribe to notifications”.
Once complete, the page shows the status “Notifications connected” and the subscription is registered on the server. After that, Komet notifications appear on the lock screen with the chat name and message text, like any ordinary messenger.
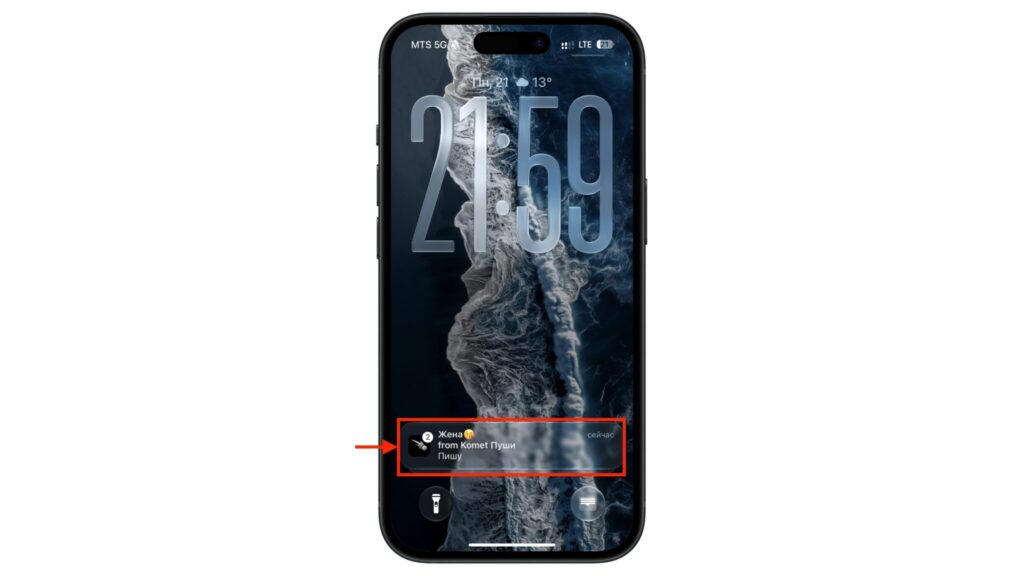
Push notifications from the Komet app
One important caveat: the home-screen icon must not be deleted, as notifications disappear with it. If pushes stop arriving, the source advises opening that icon and re-linking the subscription, because Apple occasionally changes the delivery address. The source author also reports that notifications in Komet arrived considerably faster than in the MAX web version; this is a personal observation, not a measured result.
Stories, Digital ID and other Komet features
Stories are the main reason for the whole exercise. The MAX web version does not have them at all, whereas Komet places the Stories feed directly above the chat list, just as on Android. The features do not end there, according to the source.
The profile includes a “Digital ID”, a built-in identifier card that can be shown instead of the usual personal details. There is also a large “Customisation” section with noticeably more themes, appearance options and interface settings than the standard client, so the messenger can be tailored more extensively. Alongside these, the source mentions smaller extras such as a proxy option and data spoofing.
The simplest way to post a story, per the source:
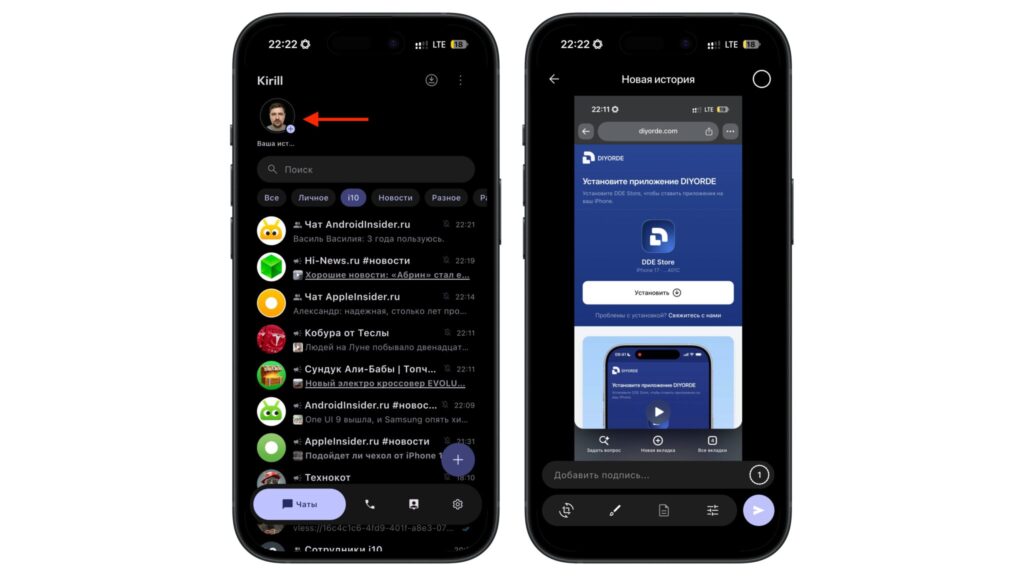
Adding a story to MAX through Komet
- On the chat list screen, tap your avatar with the plus sign in the top-left corner, labelled “Your story”.
- Choose the photo or screenshot you want to publish.
- Optionally add a caption and apply the editing tools.
- Tap the send button; the story appears in the feed above the chats.
The source also notes that themed channels can be read from the same chat list inside Komet.
Limitations and open questions
The source concludes that, in about ten minutes and with one paid subscription, an iPhone gets a fuller MAX experience with Stories, customisation and working notifications, bridging the gap with Android while the official app remains stale. Several caveats apply. The method depends on Developer Mode, which iOS itself flags as lowering device security, and on a third-party store and an unofficial client whose safety is not confirmed by any official party in the source. The push-notification setup is fragile: it breaks if the home-screen icon is removed and may need re-linking. And the pricing, payment options and account sign-in flow are all oriented toward users in Russia.