If your iPhone has two SIM cards — a physical SIM and eSIM or two eSIMs — iOS offers quite a few settings to help you avoid confusion between lines and overpaying for mobile data. Especially since an iPhone with only eSIM lasts longer thanks to an optimized body design. Below is a practical breakdown of what’s really worth configuring, especially if one line is personal and the other is for work or travel.

How to properly set up an iPhone with two SIM cards
Why You Need Two SIMs on an iPhone
There are several scenarios: personal and work numbers, a main number and a separate one for banking, or multiple eSIMs for different countries when traveling. In all cases, the point is the same — don’t mix up calls, messages, and mobile data across different numbers and don’t spend money from a plan where data is limited.
An important point: mobile data only works on one line at any given time. Calls and messages are received on both, but data goes through only one SIM. This affects how you configure everything else. If you’re still choosing between eSIM and a regular SIM card, it’s worth considering this nuance in advance.
Another common scenario is a second SIM for travel. Instead of buying a local physical card in every country, you can set up a tourist eSIM in advance through an app right on your iPhone. Your main number continues to work for calls and SMS, while internet goes through the local carrier without roaming surcharges.
SIM Card Settings on iPhone
All SIM card parameters are gathered in one place. Here’s how to access them:
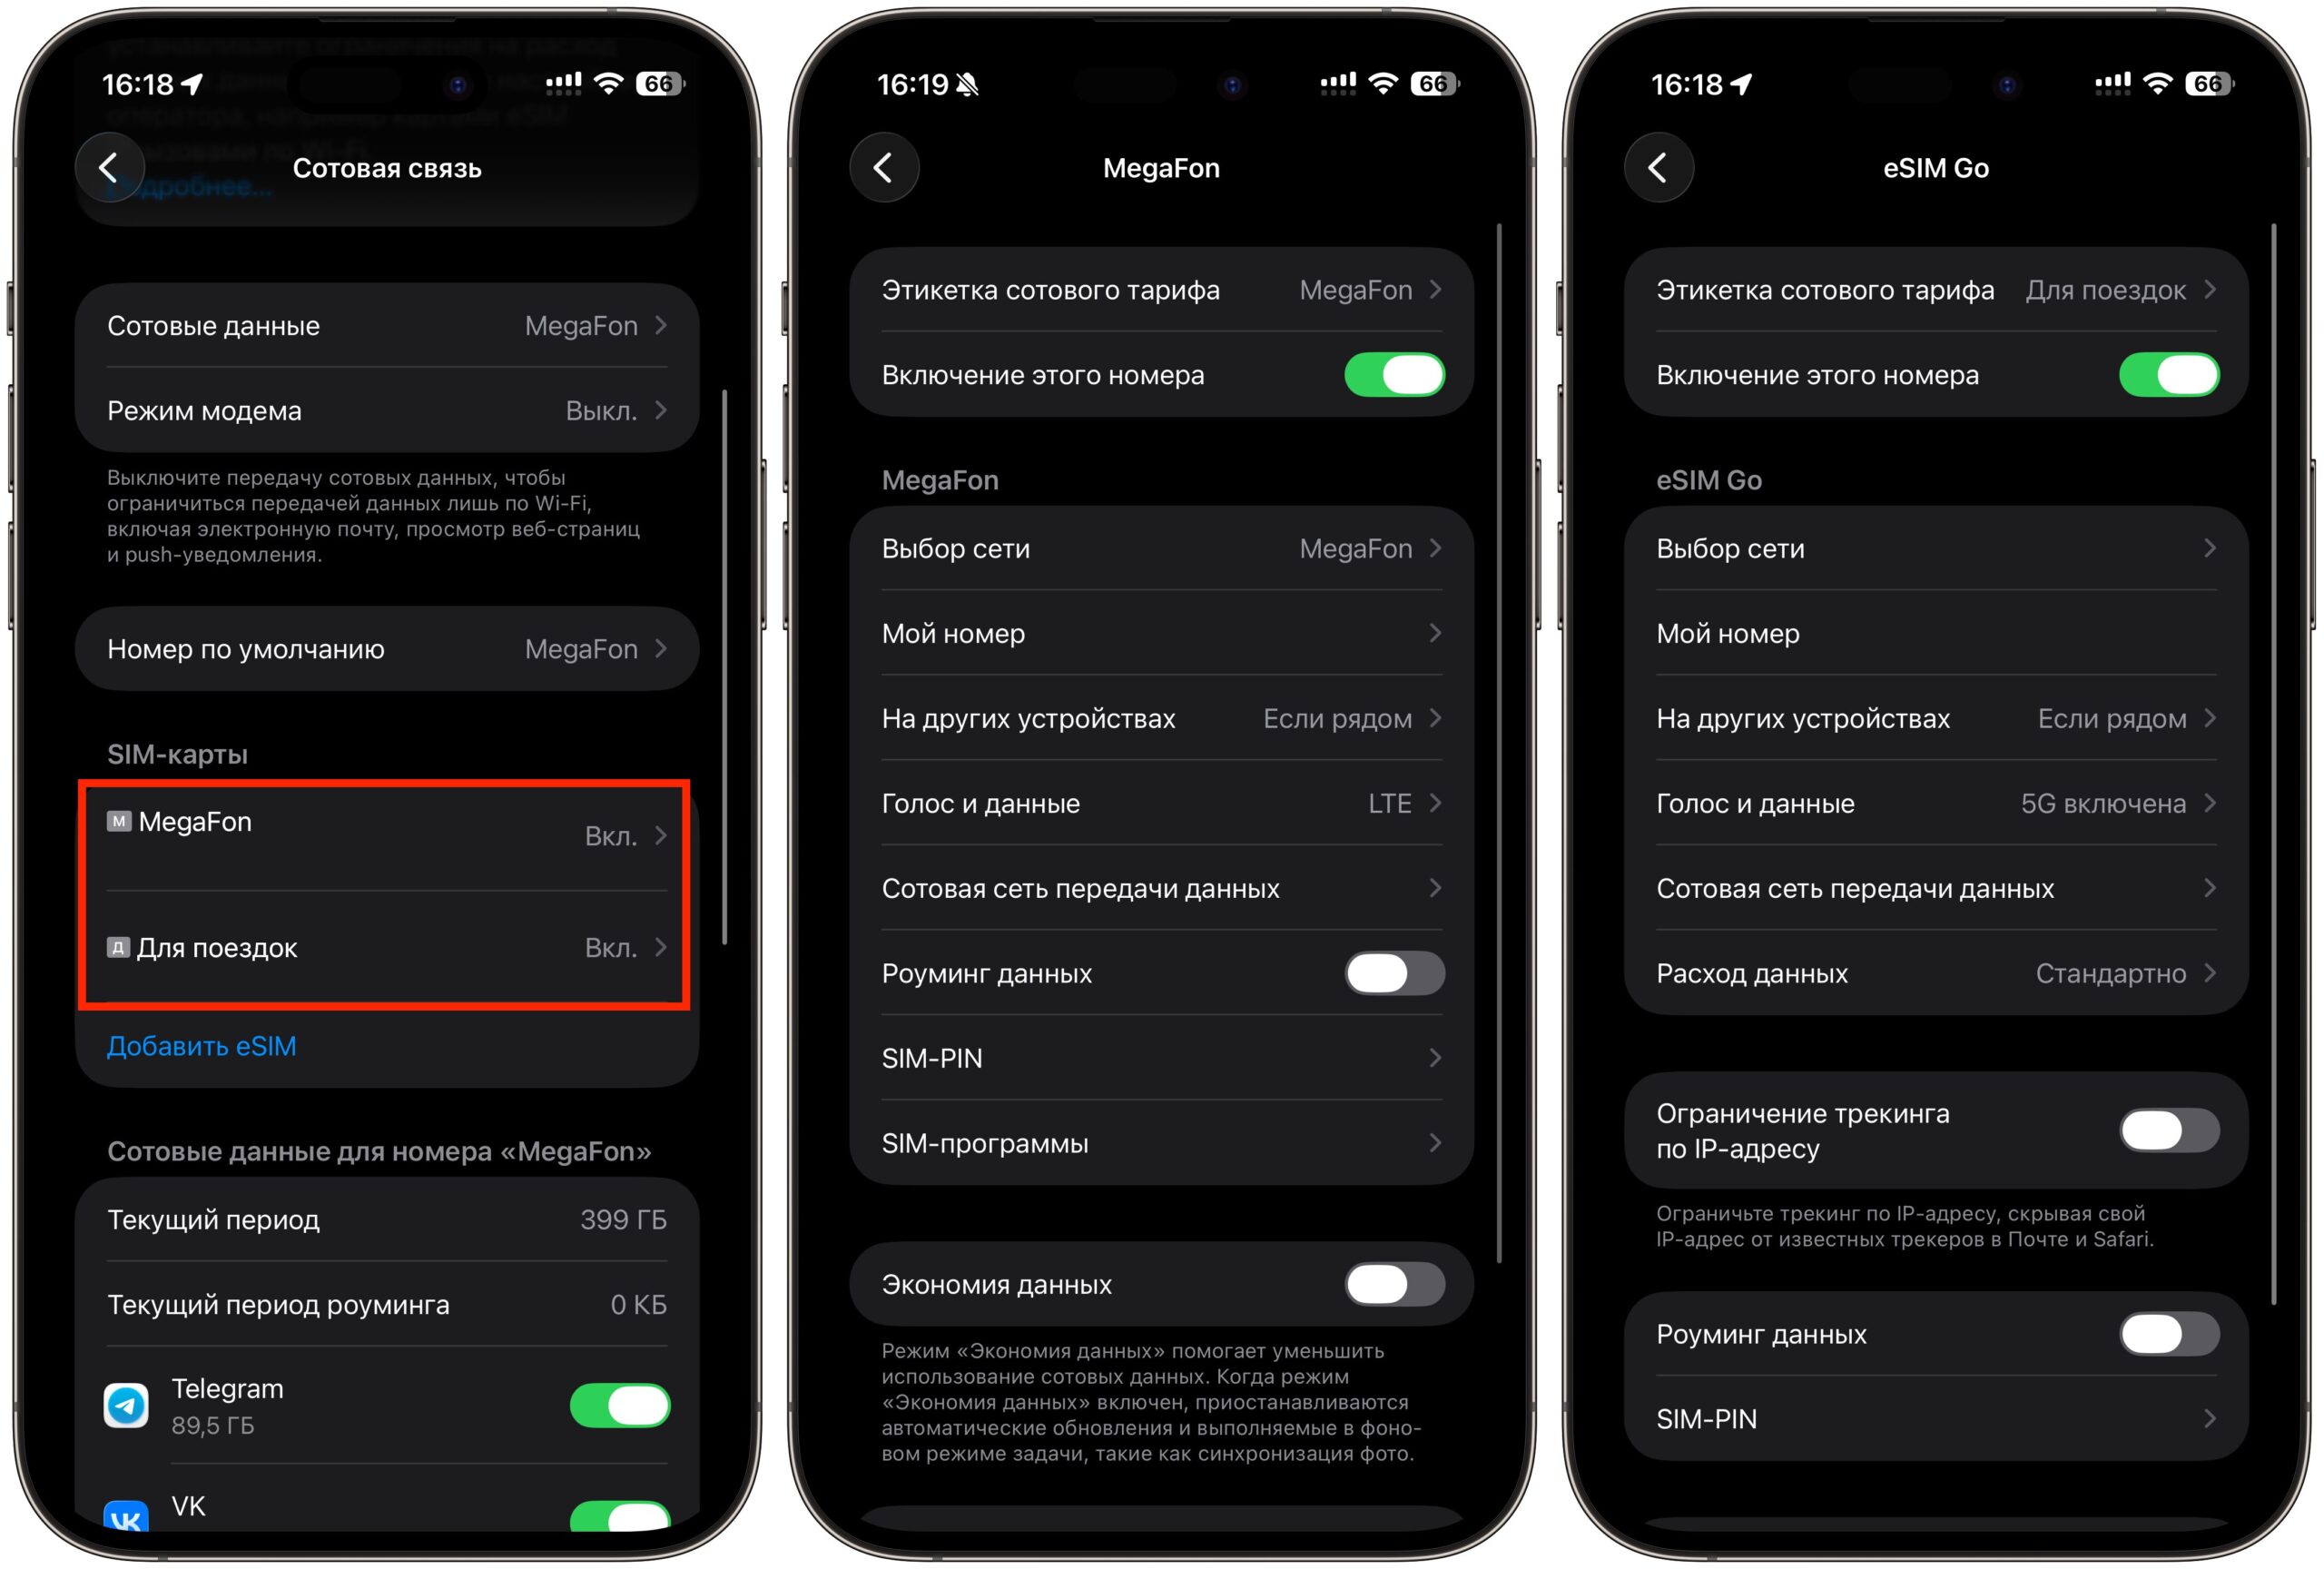
Almost all SIM card settings are gathered in one place
- Open “Settings” on your iPhone.
- Go to the “Cellular” section.
- Under the “SIM Cards” heading, select the desired line.
- For each line, separately configure the low data mode, permission for more data on 5G, and roaming.
The logic is simple: for a line with unlimited data, it makes sense to allow more data and not restrict background tasks (iCloud uploads, backups), while on a line with a limited plan — on the contrary, enable “Low Data Mode.” Pay special attention to the “Data Roaming” option within each line. If one SIM is intended for travel, roaming should be enabled in advance. But on your main line, it’s better to leave it off so you don’t accidentally connect to a foreign network and receive a bill with an unexpected amount.
How to Rename SIM Cards on iPhone
If both SIMs are from the same carrier, they’re easy to confuse by default. iOS lets you name the lines however you like. Here’s how:
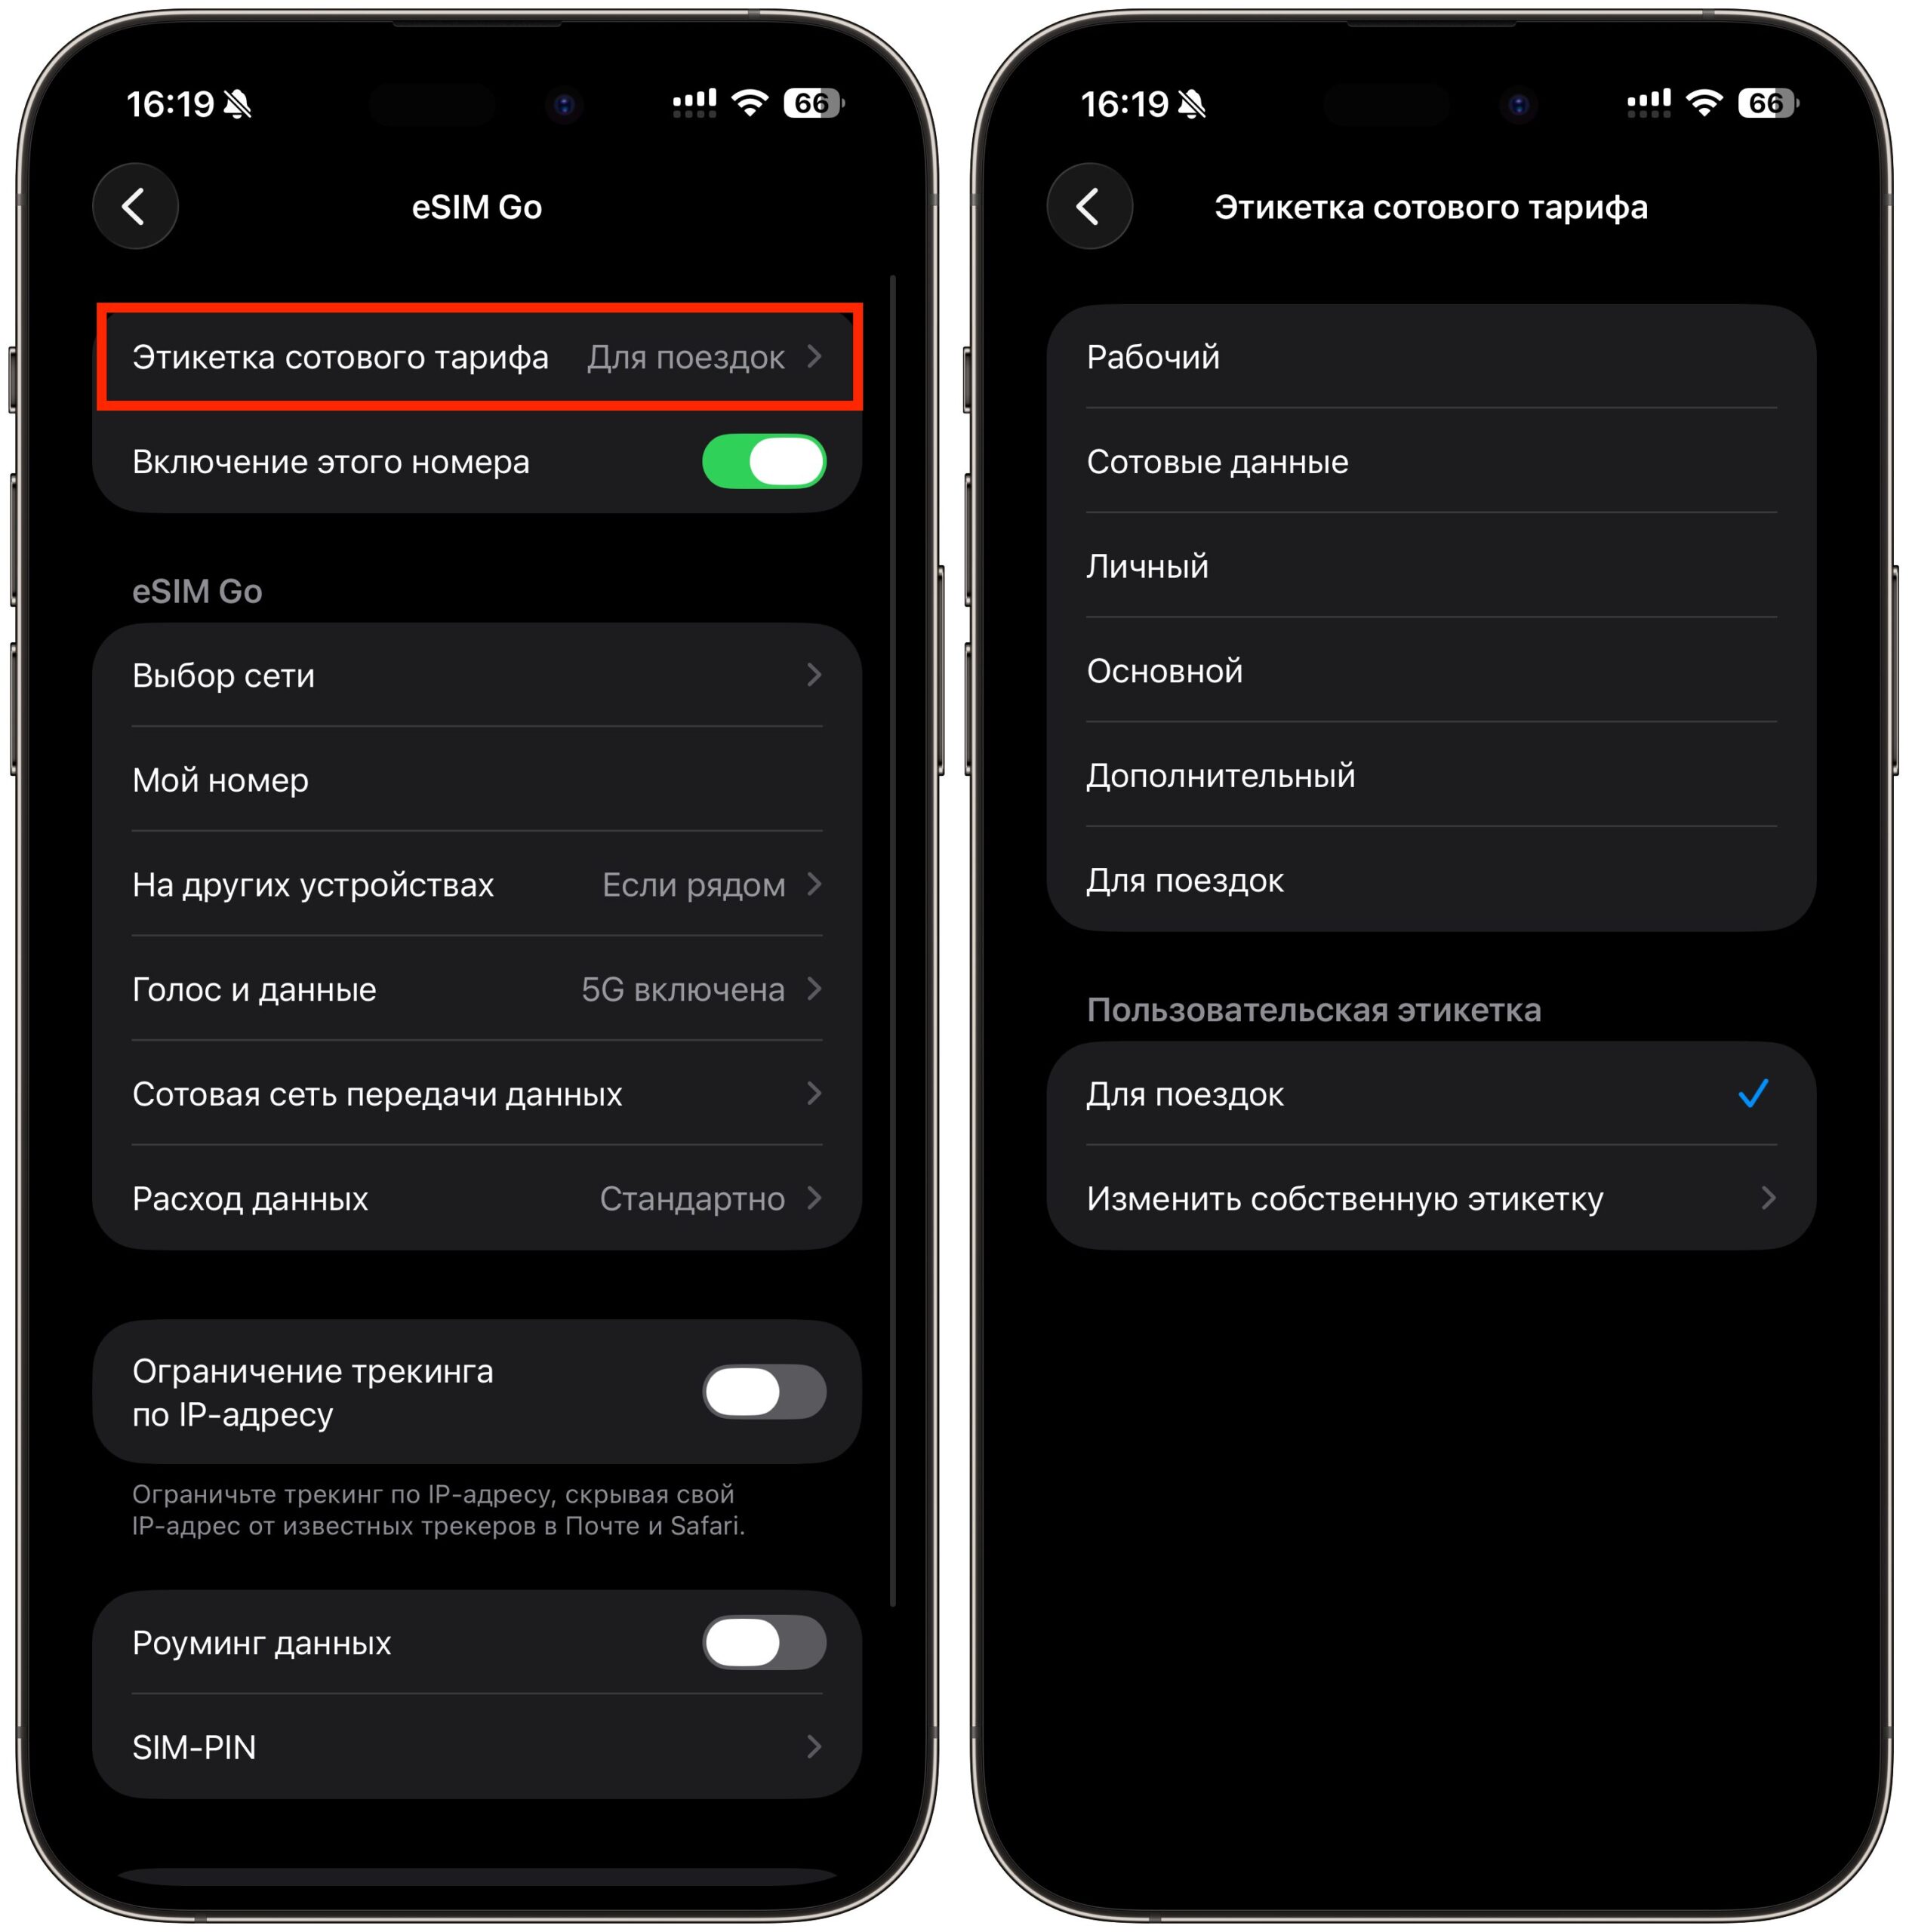
Make sure to rename your SIMs for convenience
- Open “Settings” — “Cellular.”
- Select the desired SIM line.
- Tap on “Plan Label.”
- Choose a preset option (“Personal,” “Work,” “Bank”) or enter your own name.
One nuance: the first letter of the name is used as an icon when the full name doesn’t fit on the screen, so labels should start with different letters. For example, “Work” and “Personal” — good, but “Work” and “Weekend” — bad, because both abbreviate to “W.”
Additionally, it’s worth assigning different ringtones to each line — “Settings,” “Sounds & Haptics,” “Ringtone,” where you can choose a melody separately for each SIM. By the sound, you can immediately tell which number the call is coming to, without having to look at the screen.
Choosing the Default SIM for Calls on iPhone
In cellular settings, there are two key options: “Default Voice Line” and “Cellular Data.” The first determines which number a call goes out from if you simply tap a contact or dial a number. The second controls which SIM provides mobile internet.
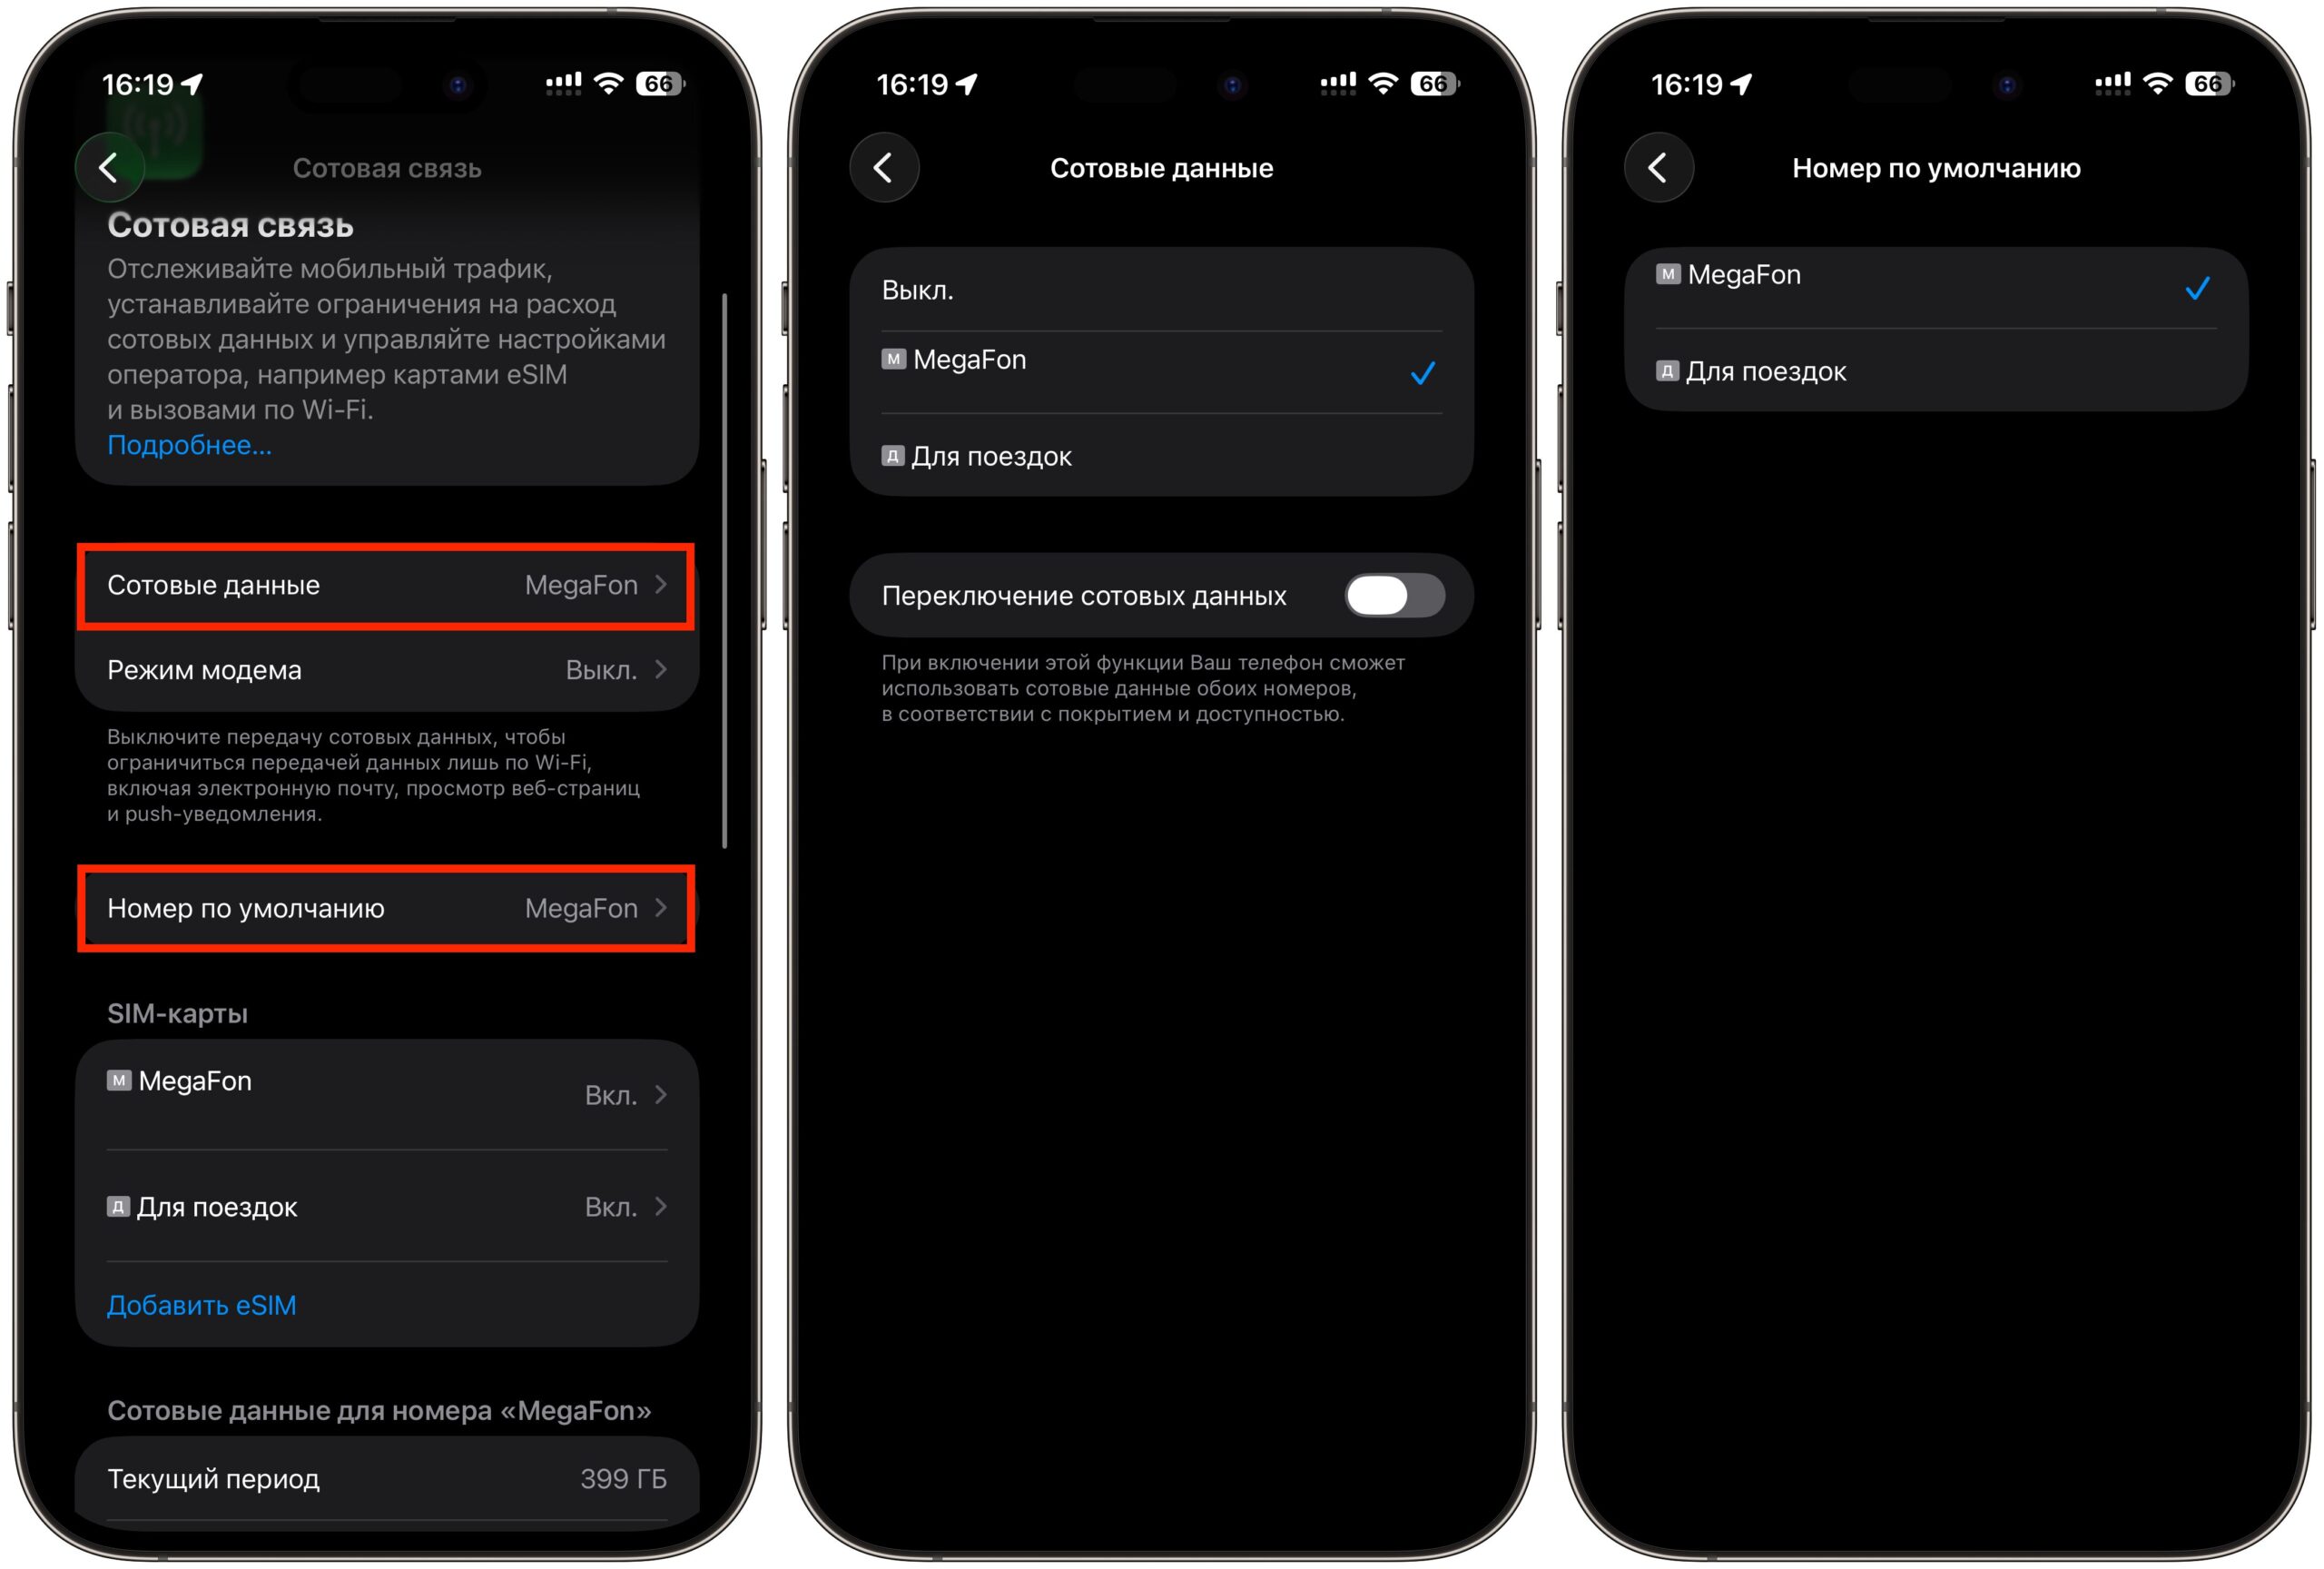
This is where the default number is selected
These settings are independent. You can, for example, make calls from your work number while getting internet from your personal line with unlimited data. Switching the data line is convenient right from the Control Center — a long press on the network block shows both SIMs.
There’s also a third setting that many people forget about — “Default iMessage Line.” If you frequently write via iMessage, it makes sense to set the same line for it as for calls. Otherwise, you might end up calling from your work number while a message to the same person goes out from your personal number — and the other person sees two different numbers.
Choosing a SIM line for an outgoing call
How to Call Specific People from the Right SIM on iPhone
If you always communicate with a specific person via your work line, you don’t need to switch manually every time. Here’s how to assign a contact to a specific SIM:
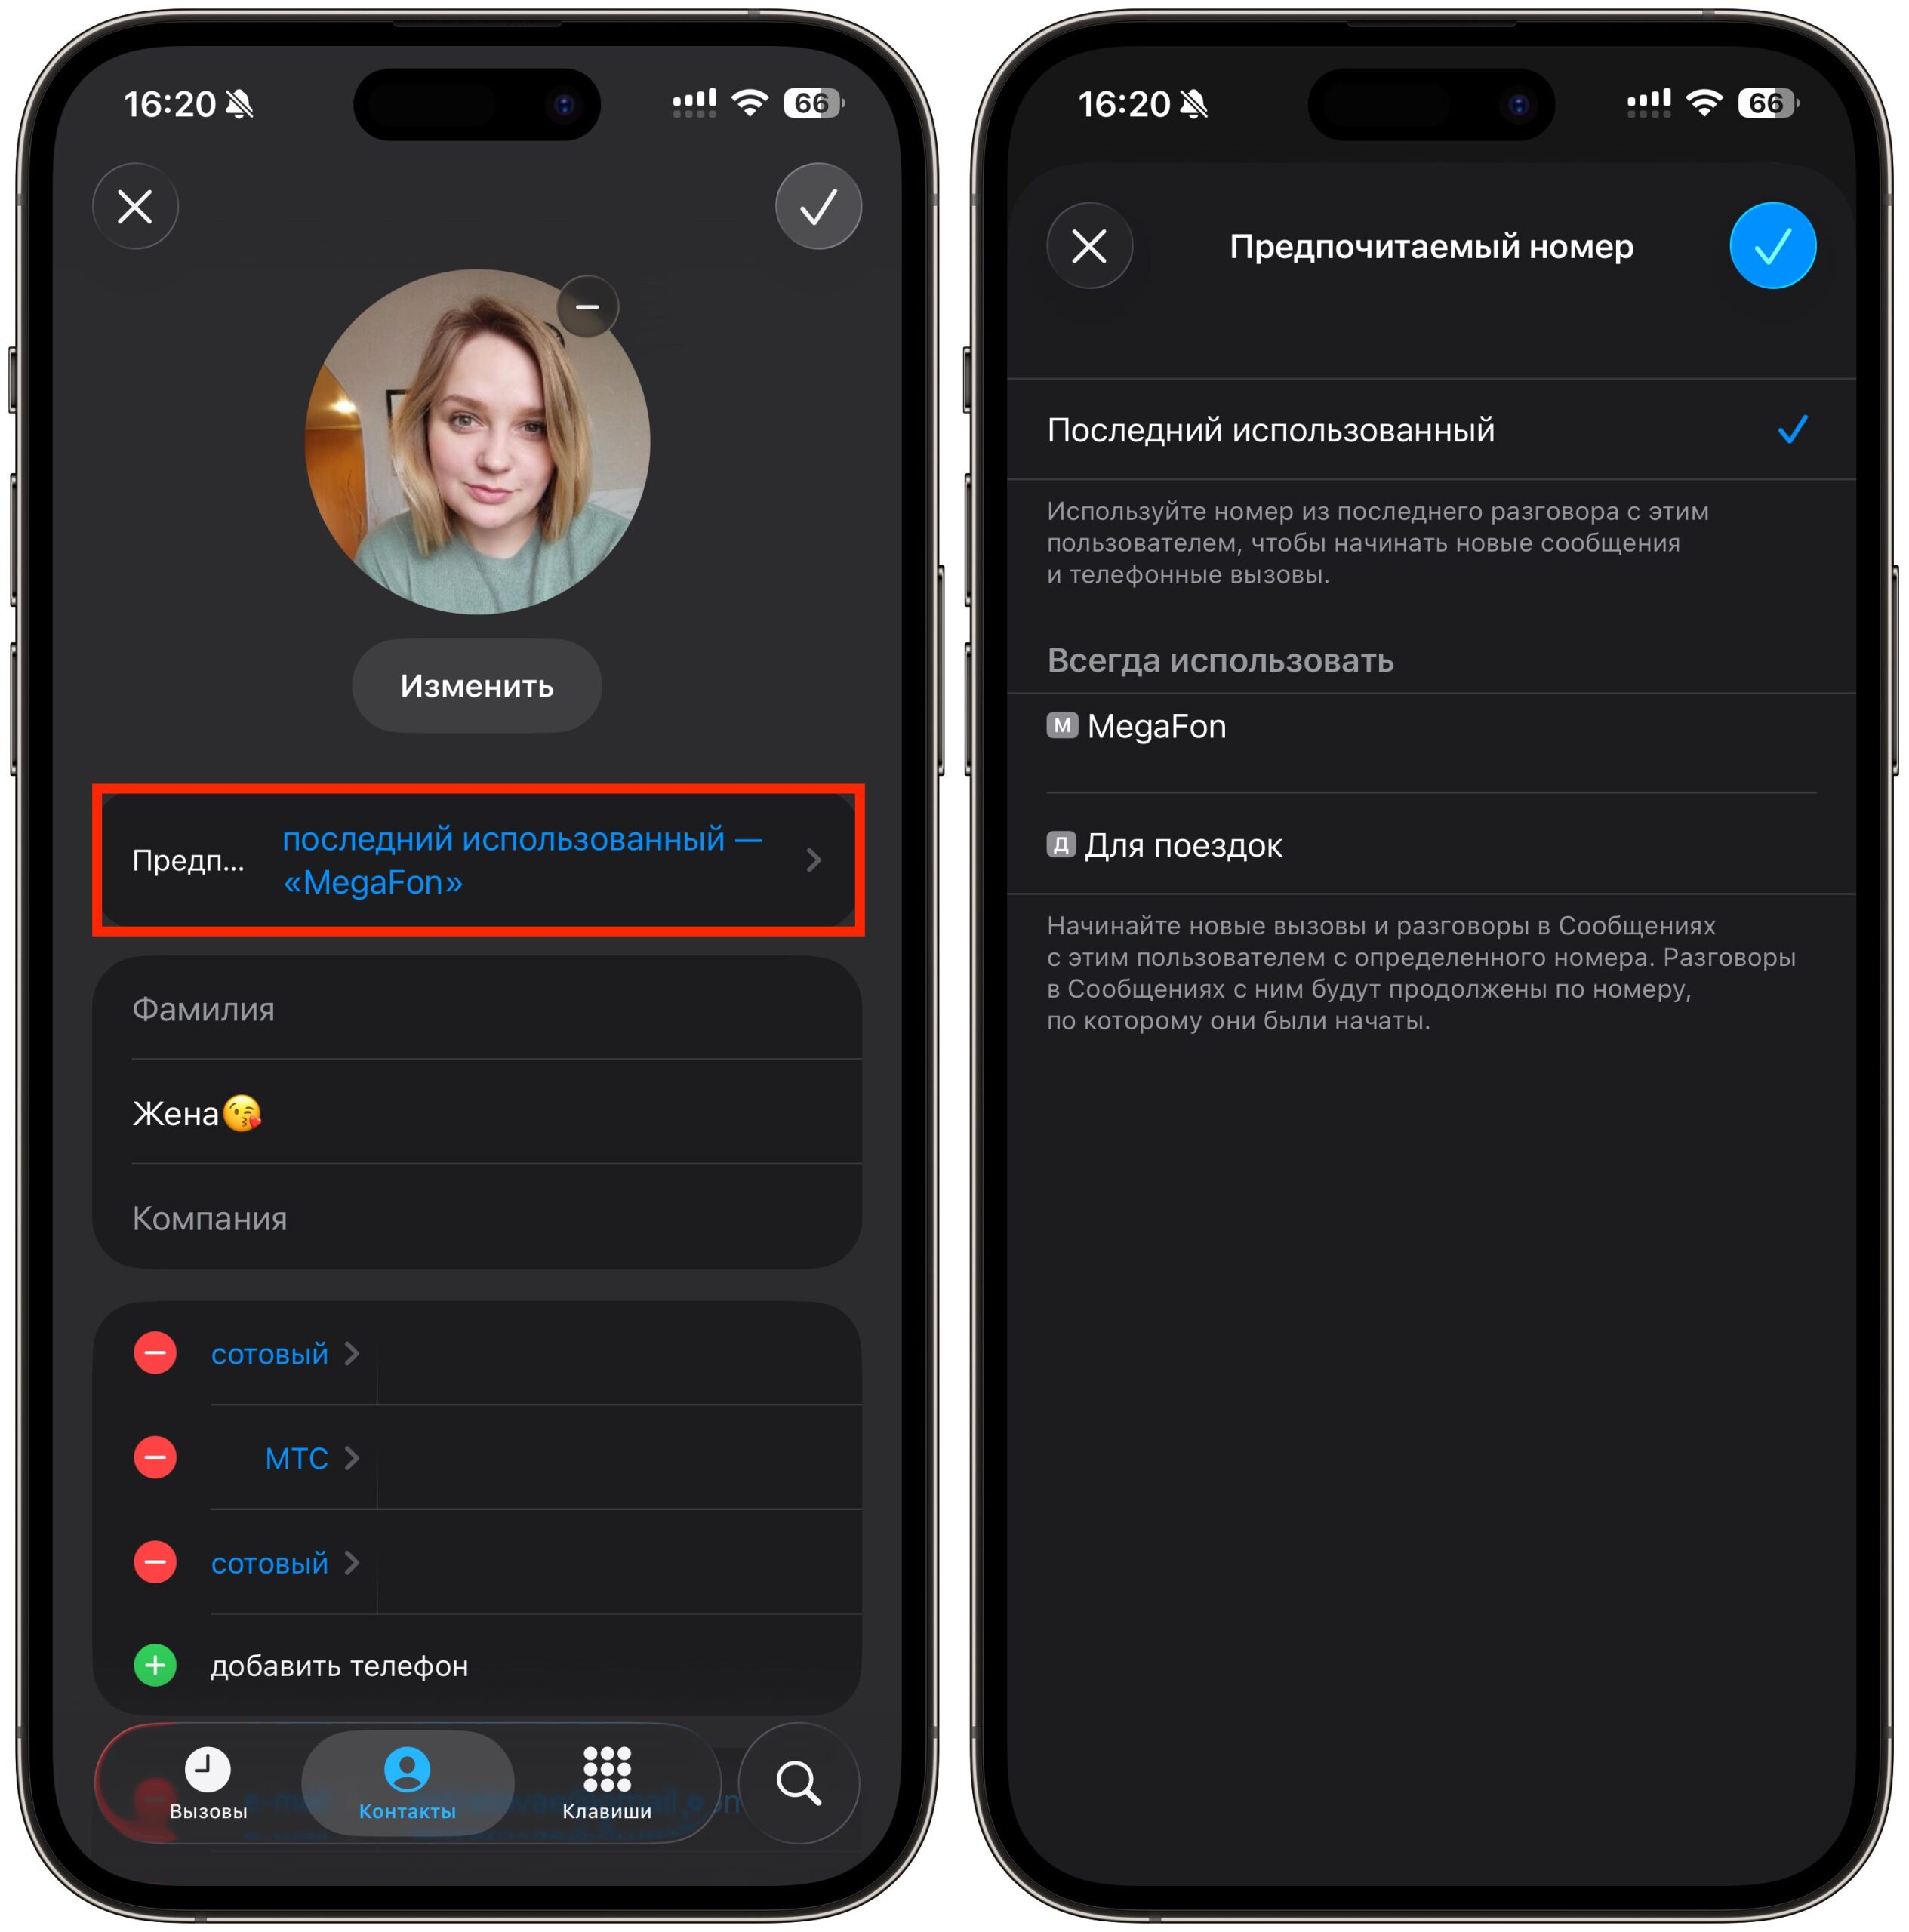
Select the desired SIM card here
- Open the “Contacts” app or a contact card in “Phone.”
- Tap “Edit” in the upper right corner.
- Find the “Preferred Cellular Plan” or “Last Used” line.
- Select the desired line — “Personal,” “Work,” or another.
- Tap “Done.”
After this, iPhone will always call this contact from the selected SIM, even if your default is a different one. The same works in reverse: for a one-time call from a different line, you can tap the SIM icon in the upper left corner of the dial pad and select the other card.
The most convenient approach is to go through your contact list right away and distribute your most frequent contacts across lines. Colleagues and clients — to work, relatives and friends — to personal. It’ll take a couple of minutes, but then you won’t have to think about switching before every call.
How to Disable Work Calls on iPhone Using Focus Mode
This is perhaps the most underrated feature for those who have a work number. Through Focus modes,