I don’t hide my attitude toward the MAX messenger. I genuinely don’t recommend anyone use it — and I have very specific reasons for that. But life worked out in such a way that other messengers got blocked, and now even when booking accommodation, I have to open MAX to contact the landlord because they “can’t load Telegram.” This is a forced necessity, not a conscious choice. But since there’s no way around it, I decided to go all in and explore the Digital ID service — a feature that turns the messenger into a digital wallet with documents. And that’s where things got really interesting…
This Digital ID cost me dearly…
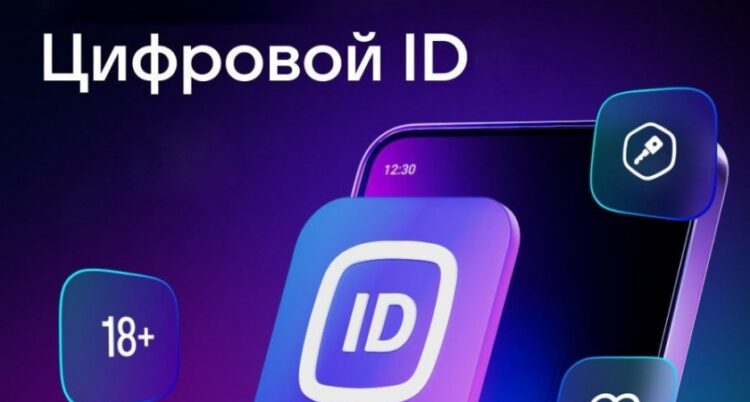
Digital ID in MAX — What Is It
Digital ID through MAX is an electronic equivalent of your documents, linked to your Gosuslugi (Government Services) account. Essentially, it’s something that has long existed in the “Goskey” app and on the Gosuslugi portal itself, only now it’s packaged within the interface of the national messenger.
After creating a Digital ID, your documents appear in the “Digital ID” section of the MAX app: passport, SNILS (social insurance number), INN (taxpayer ID), and OMS (mandatory health insurance) policy. Each of them can be presented as a QR code — at a store checkout, in a government office, or anywhere else that accepts a digital passport. The idea itself is convenient: you don’t need to carry a wallet with documents, a smartphone is enough. The real question is — at what cost this convenience comes.
Everyone is promoting Digital ID
It’s important to understand that Digital ID without MAX is not available in the same format. Formally, Gosuslugi also offers a mobile ID, but it’s specifically the integration with MAX that makes it applicable in retail stores and a number of other scenarios. So if you want to pay with your face or show an electronic passport to a cashier — you can’t do without installing MAX.
Why Digital ID Is Dangerous
This is where the part I wrote this text for begins. When I started creating a Digital ID in MAX, the app redirected me to Gosuslugi — and a screen appeared requesting consent to data transfer. I expected to see something like “first name, last name, date of birth.” But the list turned out to be significantly longer.
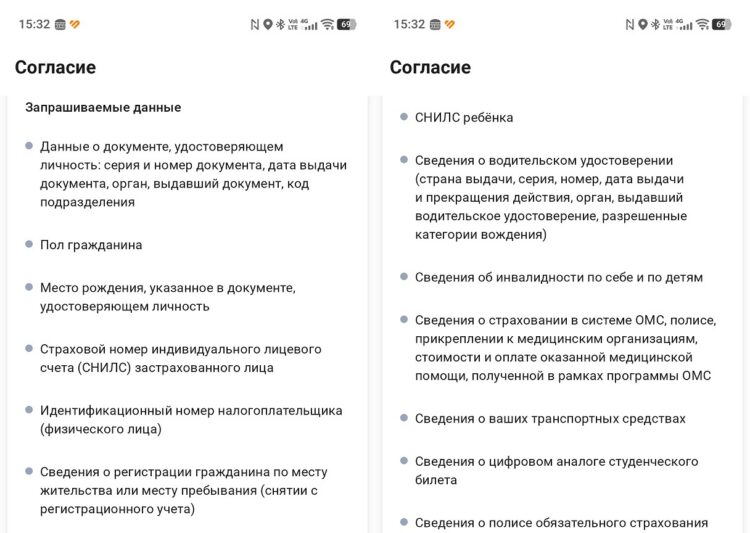
So here’s what the Digital ID service requests from your Gosuslugi account:
- identity document data: series and number, date of issue, issuing authority, department code;
- citizen’s gender;
- place of birth as stated in the identity document;
- SNILS (insured person’s social insurance number);
- individual taxpayer identification number (INN);
- information about registration at place of residence or place of stay, deregistration;
- birth certificate details: series and number, date of issue, place of state registration;
- child’s INN;
- child’s SNILS;
- driver’s license details: country of issue, series, number, date of issue and expiration, issuing authority, permitted categories;
- disability information — for yourself and your children;
- information about OMS insurance, policy, attachment to medical organizations, cost and payment for medical services received;
- vehicle information;
- digital student ID information;
- OSAGO (mandatory auto insurance) policy information;
- state registration plate number, series and number of vehicle registration certificate;
- date of birth;
- child’s surname, first name, patronymic;
- child’s gender;
- large family certificate;
- child’s birth certificate details;
- child’s SNILS (repeated, in a separate entry);
- children’s OMS insurance information;
- electronic pensioner certificate;
- electronic disability information;
- digital student ID information.
And that’s not all. In addition to the above, Digital ID by fingerprint also requires biometric data, meaning the messenger effectively gains access to your biometrics as well.
Digital ID really asks for a lot
I stopped at this screen and reread the list several times. A messenger that I installed out of necessity wants to know about my cars, my children, about disability — mine and my children’s. About which clinic I’m registered at and how much my OMS treatment cost. Whether I’m a pensioner or a student. All of this — just to show a passport at the checkout in a grocery store? Most of these data points aren’t even needed for the stated function.
Formally, of course, this is voluntary consent. You can refuse. But then Digital ID without MAX doesn’t work in the required format, and the feature becomes pointless. It turns out that Digital ID security is primarily a question of how much you trust the entity receiving this data. And considering that MAX’s privacy policy explicitly allows data transfer to third parties — I don’t trust it much.
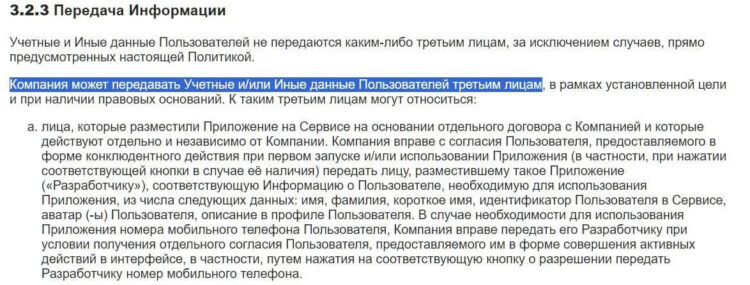
MAX openly states it transfers data. Source: legal.max.ru
I want to separately address children’s data. The permissions list includes several items about children: child’s SNILS, child’s INN, gender, date of birth, birth certificate data, children’s OMS information, children’s disability status. Why? If you don’t have children, some of these items simply don’t apply. But if you do — you’re agreeing to transfer data about minors to a messenger whose data storage and sharing policy raises serious concerns.
The argument “I have nothing to hide” doesn’t work here. The question isn’t whether you’re concealing something from an all-seeing eye. Information about your health, children, vehicles, and registration — this is sensitive data whose leak could be costly. And if you think that’s impossible — look at the history of data breaches at major Russian services. Is Digital ID safe under these conditions? I’ll answer honestly: I’m not sure.
How to Create a Digital ID in MAX
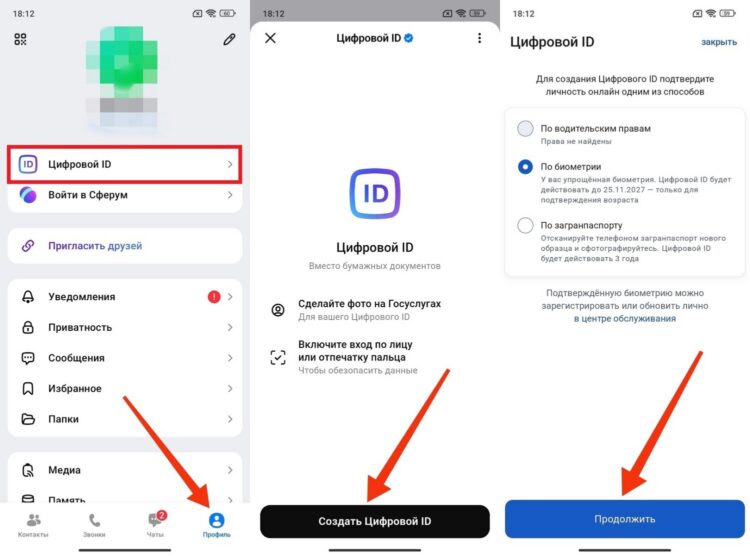
If you’ve weighed everything and decided you need this — the procedure is straightforward. Here’s what setting up a Digital ID looks like:
- Open the MAX app and go to the “Profile” tab.
- Find the “Digital ID” section and tap “Create Digital ID.”
- The app will redirect you to Gosuslugi — choose an identity verification method. The simplest is biometric verification.
- Carefully read the list of requested data and give consent for its transfer.
- Take a selfie — the system will compare your face with the photo from your documents.
- Wait for confirmation. Usually it takes a few seconds, but sometimes additional verification is required.